Description
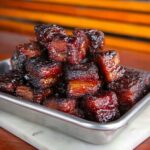
This Hot Dog Burnt Ends recipe transforms ordinary beef hot dogs into a smoky, caramelized, and flavorful treat perfect for parties or game day. Seasoned with a barbecue rub and slow-smoked to develop crispy edges, the hot dogs are then glazed with a sweet and tangy sauce that creates an irresistible sticky finish. Garnished with fresh parsley and sesame seeds, these bite-sized delights offer a perfect balance of smoky, sweet, and spicy flavors.
Ingredients
Scale
Hot Dogs
- 2 pounds beef hot dogs (about 16 hot dogs), cut into 1-inch pieces
Seasoning & Coating
- 3 tablespoons unsalted butter, melted
- 1/4 cup brown sugar, packed
- 2 tablespoons barbecue rub (your favorite blend)
- 1 teaspoon smoked paprika
- 1/2 teaspoon garlic powder
- 1/2 teaspoon black pepper
Glaze
- 1 cup barbecue sauce (sweet and smoky varieties work best)
- 3 tablespoons honey
- 1 tablespoon apple cider vinegar
- 1 teaspoon hot sauce (optional, for a spicy kick)
Garnish
- 2 tablespoons fresh parsley, chopped
- Sesame seeds (optional)
Variations
- Use turkey or chicken hot dogs for a leaner option
- Swap honey with maple syrup or agave nectar
- Try coconut aminos instead of barbecue sauce for a lower-sugar alternative
- Use vegan hot dogs and dairy-free butter for a plant-based version
Instructions
- Prepare Your Hot Dogs: Cut the hot dogs into 1-inch thick bite-sized pieces to ensure maximum caramelization while keeping them juicy. Place the cut pieces in a disposable aluminum pan to make cleanup easier and catch drippings.
- Season Generously: Drizzle melted butter over the hot dog pieces and toss gently to coat evenly. In a small bowl, combine brown sugar, barbecue rub, smoked paprika, garlic powder, and black pepper, then sprinkle this mixture over the hot dogs, stirring until each piece is well-coated for a caramelized crust.
- Start Smoking: Preheat your smoker to 250°F. If using a grill, set up for indirect heat and add wood chips like hickory or applewood. Place the pan with the hot dogs in the smoker and cook uncovered for 1 hour until edges start darkening and crisping.
- Make the Glaze: While smoking, whisk together barbecue sauce, honey, apple cider vinegar, and optional hot sauce in a medium bowl. Adjust sweetness or tanginess by adding more honey or vinegar as desired.
- Add the Glaze: After the first hour, remove the pan and pour half the glaze over the hot dog burnt ends, stirring gently to coat. Return to the smoker and continue cooking for 45 minutes to 1 hour, stirring every 20 minutes to allow the glaze to thicken and stick.
- Finish and Rest: Once the hot dogs develop deep caramelization with crispy edges and a glossy glaze, remove from the smoker, drizzle with remaining glaze, and let rest for 5 minutes to set the glaze for easier serving.
- Garnish and Serve: Transfer to a serving platter, sprinkle with fresh parsley and sesame seeds for freshness and visual appeal, and serve immediately with toothpicks for convenient snacking.
Notes
- Using a disposable aluminum pan makes cleanup easier and helps collect flavorful drippings.
- Adjust the amount of honey or vinegar in the glaze to balance sweetness and tanginess to your preference.
- For a spicier version, increase hot sauce amount or add cayenne pepper to the rub.
- Ensure smoker maintains a steady temperature of 250°F for even cooking and caramelization.
- If you don’t have a smoker, a grill set for indirect heat with added wood chips replicates smoky flavor well.
- Resting the burnt ends after glazing helps the sauce set and prevents it from becoming too sticky to handle.