
“`html
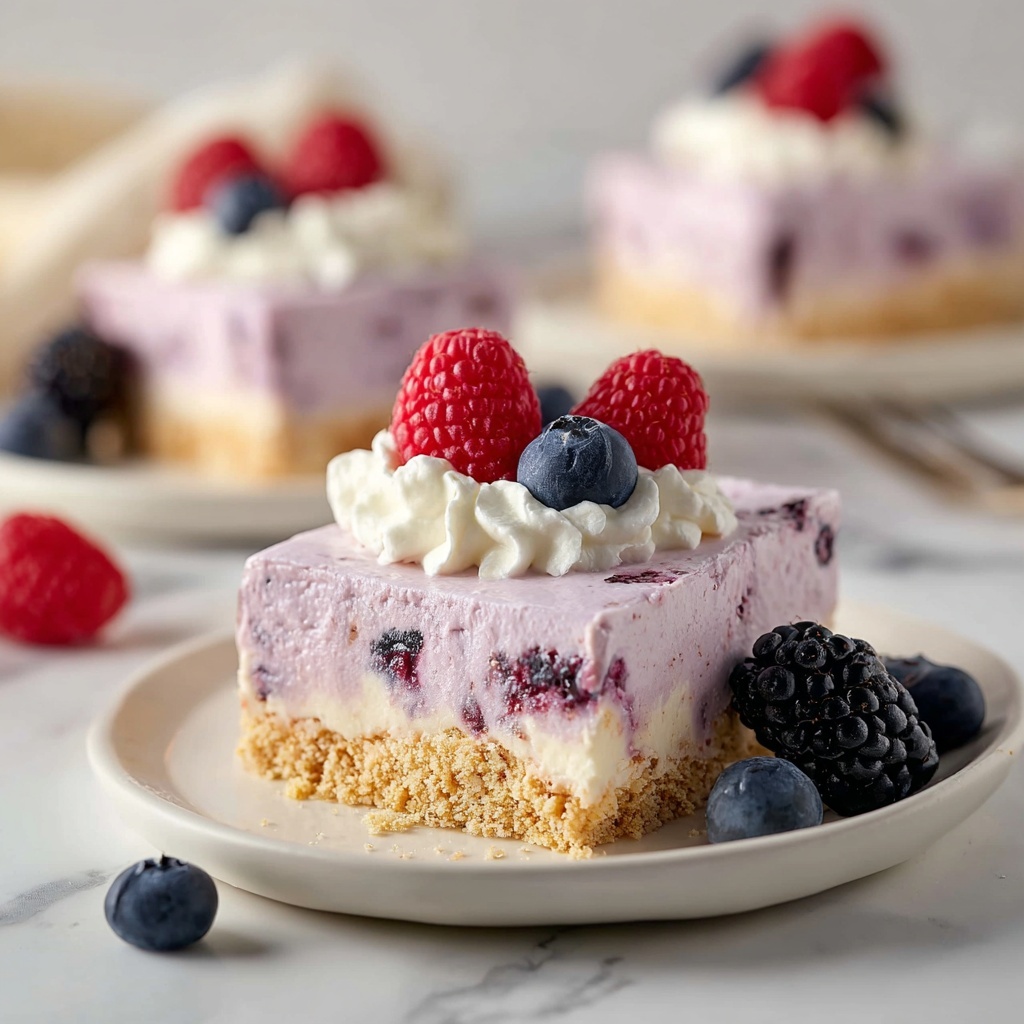
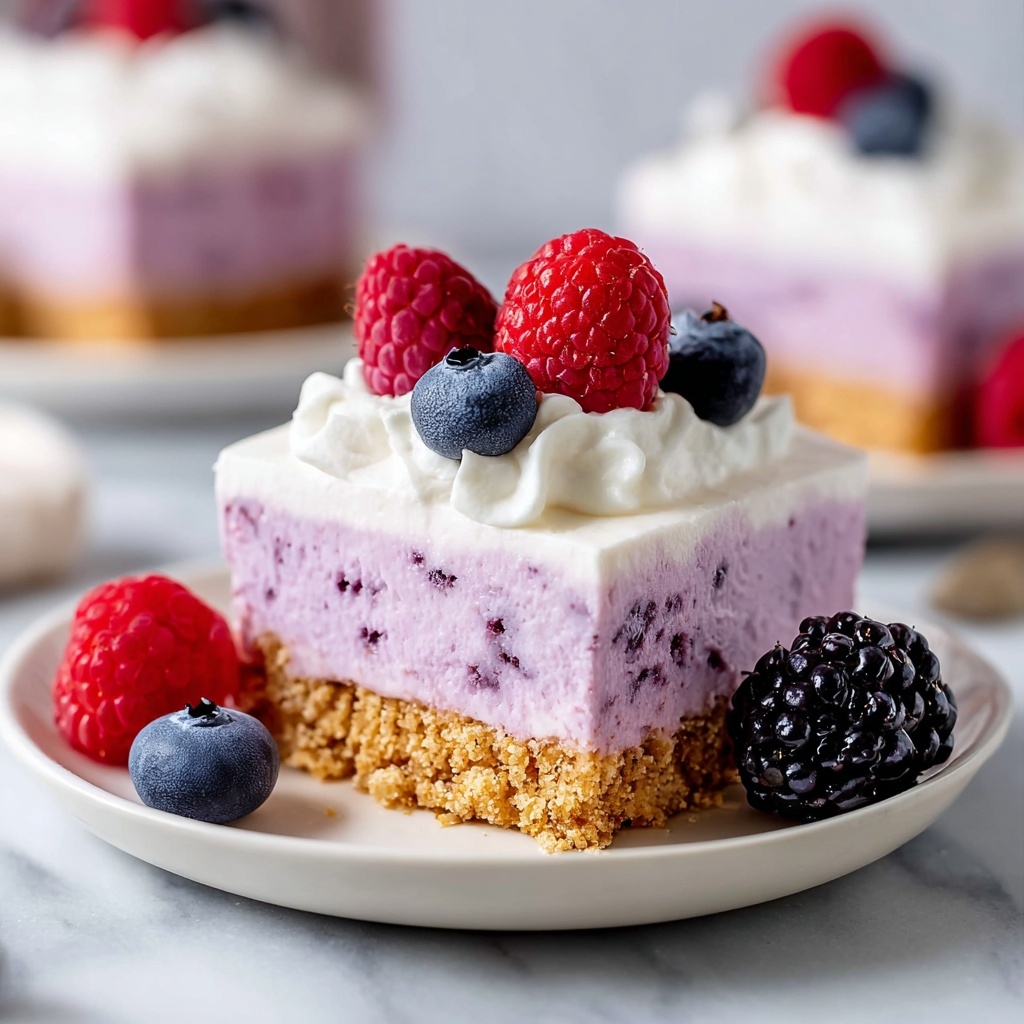
If you’ve been searching for a delightfully creamy, fresh, and fruity dessert that practically makes itself, let me introduce you to this irresistible No-Bake Berry Cheesecake Recipe. It combines a buttery graham cracker crust with a light, fluffy cream cheese filling and bursts of vibrant fresh berries. The best part? No oven required, which means you can have a gorgeous dessert ready to impress in just a few hours. Whether you’re hosting friends or craving something special at home, this cheesecake balances sweetness and tang with the natural juiciness of berries for a perfect summer treat or anytime indulgence.
Ingredients You’ll Need
This No-Bake Berry Cheesecake Recipe relies on simple, classic ingredients that come together beautifully. Each component plays a vital role: the crust provides a crunchy, buttery base, the cream cheese filling gives a luxuriously smooth texture, and the fresh berries bring vibrant color along with tangy-sweet flavor that lifts the entire dessert. Here’s exactly what you’ll want to gather:
- 2 Cups Low Fat Graham Cracker Crumbs: The sturdy yet tender foundation that soaks up buttery goodness and adds crunch.
- 6 Tbsp. Butter, melted: Binds the crumbs together for the perfect crust firmness and rich flavor.
- 3 Tbsp. Sugar: Adds just a touch of sweetness to the crust for balance.
- 4 Pkgs. (8 oz. each) Philadelphia 1/3 Less Fat Cream Cheese (Neufchatel), softened: The smooth, tangy heart of the cheesecake, providing creaminess without being heavy.
- 1 Cup Sugar: Sweetens the filling, harmonizing the cream cheese with the bright berries.
- 3 Cups Fresh Berries (blackberries, raspberries, blueberries, and chopped strawberries): A colorful mix of juicy fruits that adds freshness and vibrancy.
- 1 Tub (8 oz.) Cool Whip, thawed: Lightens up the filling and creates a fluffy, melt-in-your-mouth texture.
How to Make No-Bake Berry Cheesecake Recipe
Step 1: Prepare the Crust
Start by combining the graham cracker crumbs, melted butter, and 3 tablespoons of sugar in a bowl. Stir until every crumb is lightly coated and the mixture feels like wet sand. Press this mixture firmly into the bottom of your pan, creating an even, compact crust layer. This step is critical because a well-packed crust ensures your cheesecake holds together beautifully when sliced.
Step 2: Mix the Cream Cheese Filling
In a large bowl, beat the softened cream cheese with one cup of sugar until smooth and creamy. The key here is to ensure there are no lumps, so your filling achieves that velvety texture we all love. Once smooth, gently fold in the thawed Cool Whip, blending just enough to maintain a light, airy consistency that will balance the richness of the cream cheese.
Step 3: Incorporate the Berries
Next, fold in the fresh berries carefully into the cream cheese mixture. The variety of berries not only creates a dazzling rainbow of colors but also bursts with different tangy flavors and juicy textures that complement the sweet and creamy filling. Handle the berries gently to keep them whole, rather than turning the filling purple or red.
Step 4: Assemble the Cheesecake
Spread the berry-filled cream cheese mixture evenly over the prepared crust. Smooth the top with a spatula for a neat finish. This layer should be thick and luscious, promising a bite packed with creamy and fruity delight.
Step 5: Chill to Perfection
Cover your cheesecake and refrigerate it for at least 4 hours, or until fully set. This chilling phase is so important because it allows the flavors to meld and the filling to firm up, giving you clean slices and a perfectly chilled dessert. Patience here absolutely pays off!
How to Serve No-Bake Berry Cheesecake Recipe
Garnishes
When it’s time to serve, a few extra touches can heighten the appeal. Garnish each slice with a sprinkle of extra fresh berries on top and a light dusting of powdered sugar or a drizzle of honey for a sparkling finish. A sprig of mint adds a lovely pop of green and a fresh aroma that’s just so welcoming.
Side Dishes
This cheesecake pairs wonderfully with a cup of strong coffee or a refreshing sparkling lemon water. For an extra indulgent spread, offer alongside a scoop of vanilla bean ice cream or a dollop of whipped cream for guests who want to amp up the creaminess.
Creative Ways to Present
If you want to wow your guests or family, try assembling individual servings in clear dessert glasses. Layer the crust crumbs, cream cheese mixture, and berries for a parfait effect that looks as good as it tastes. Alternatively, turn this into mini cheesecakes by using a muffin tin lined with cupcake liners — perfect for parties and easy serving.
Make Ahead and Storage
Storing Leftovers
Leftover No-Bake Berry Cheesecake Recipe keeps beautifully refrigerated, tightly covered, for up to 3 days. Keeping it chilled maintains the creamy texture and fresh berry flavor, so be sure to wrap it well to avoid any fridge odors mixing in.
Freezing
For longer storage, you can freeze the cheesecake. Wrap it securely in plastic wrap and then in a layer of foil to prevent freezer burn. Frozen cheesecake stays at its best for up to one month. When ready to enjoy, thaw overnight in the fridge for the best texture and flavor.
Reheating
Because this is a no-bake cheesecake, reheating isn’t necessary — and actually not recommended, as the creamy texture and fresh berries are best served cold. Simply thaw as described and serve chilled for optimal taste and consistency.
FAQs
Can I use frozen berries for this No-Bake Berry Cheesecake Recipe?
You can, but be sure to thaw them completely and drain any excess juice before folding them into the filling to prevent your cheesecake from becoming watery.
Is it possible to make this recipe gluten-free?
Absolutely! Just swap the graham cracker crumbs for a gluten-free alternative like gluten-free cookie crumbs or almond flour to keep it safe and delicious.
How long does the cheesecake need to chill?
The cheesecake needs at least 4 hours to set properly, but overnight chilling will give you the best flavor and firmest texture for perfect slices.
Can I use regular cream cheese instead of the 1/3 less fat version?
Yes, regular cream cheese will work and may give a richer flavor. Just keep in mind the texture might be a little denser, but still wonderful.
What’s the best way to slice this cheesecake?
Use a sharp knife dipped in hot water and wiped dry between each cut. This helps to get clean slices without sticking or crumbling edges.
Final Thoughts
If you’re looking to impress without the fuss, this No-Bake Berry Cheesecake Recipe is your new best friend. It’s simple, stunning, and downright delicious — everything you want from a homemade dessert. Trust me, once you try it, it will become a go-to crowd-pleaser for all your special occasions or cozy nights in. So grab those fresh berries and get ready to enjoy a slice of sweet, creamy happiness!
“`
Print
No-Bake Berry Cheesecake Recipe
- Prep Time: 15 minutes
- Cook Time: 0 minutes
- Total Time: 4 hours 15 minutes
- Yield: 16 servings
- Category: Dessert
- Method: No-Cook
- Cuisine: American
- Diet: Low Fat
Description
This No-Bake Berry Cheesecake is a light and refreshing dessert featuring a buttery graham cracker crust, creamy low-fat cream cheese filling, and a vibrant medley of fresh berries topped with whipped topping. Perfect for warm weather or when you’re craving a delicious dessert without turning on the oven.
Ingredients
Crust
- 2 Cups Low Fat Graham Cracker Crumbs
- 6 Tbsp. Butter, melted
- 3 Tbsp. Sugar
Filling
- 4 Pkg. (8 oz. each) Philadelphia 1/3 Less Fat Cream Cheese (Neufchatel), softened
- 1 Cup Sugar
- 1 Tub (8 oz.) Cool Whip, thawed
Topping
- 3 Cups Fresh Berries (blackberries, raspberries, blueberries, and chopped strawberries)
Instructions
- Prepare crust: In a medium bowl, combine the graham cracker crumbs, melted butter, and 3 tablespoons sugar. Mix until all the crumbs are evenly coated with butter and the mixture holds together when pressed.
- Form crust base: Press the crumb mixture firmly into the bottom of a 9-inch springform pan or pie plate to create an even crust layer. Refrigerate to set while preparing the filling.
- Make filling: In a large mixing bowl, beat the softened cream cheese and 1 cup sugar together until the mixture is smooth and creamy, free of lumps.
- Fold in whipped topping: Gently fold the thawed Cool Whip into the cream cheese mixture until well combined and light in texture, being careful not to overmix.
- Assemble cheesecake: Pour the creamy filling over the prepared crust and spread evenly with a spatula. Smooth the top for an even surface.
- Add berry topping: Scatter the fresh mixed berries evenly over the surface of the cheesecake, pressing them lightly into the filling to adhere.
- Chill: Refrigerate the assembled cheesecake for at least 4 hours, or until firm and fully set to ensure it holds shape when sliced.
- Serve: Once chilled, remove from the refrigerator and slice into 16 servings. Serve chilled for the best flavor and texture.
Notes
- For best results, use fresh berries that are in season and ripe for sweetness.
- This recipe uses low-fat cream cheese and light Cool Whip to reduce calories and fat while maintaining creaminess.
- The cheesecake needs a minimum of 4 hours chilling time but overnight is preferred for optimal firmness.
- You can substitute the graham cracker crumbs with digestive biscuits for a different flavor profile.
- This dessert is best stored in the refrigerator and consumed within 2-3 days for freshness.

