
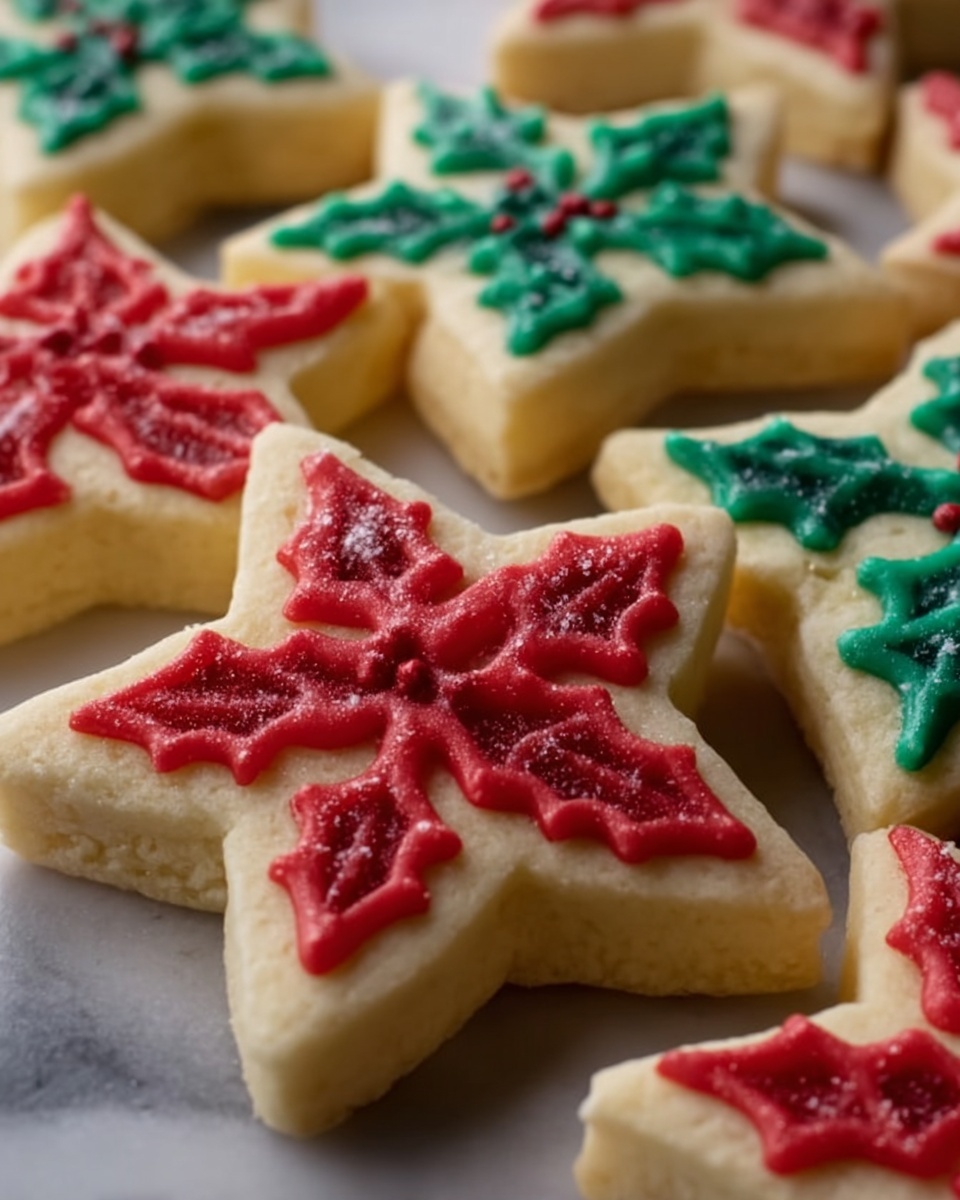
If you have ever dreamed of creating those delightful, perfect-shaped cookies that bring a smile to every occasion, this Cut Out Sugar Cookie Recipe is just the ticket. It captures the essence of classic sugar cookies with a tender crumb and subtle sweetness that supports any decoration you fancy, making it an all-time favorite in my kitchen. The balance of flavors and textures in this recipe truly shines, whether you’re baking for a holiday celebration or just because you crave a nostalgic, comforting treat. Everyone deserves to experience the simple joy of rolling, cutting, and decorating these charming cookies, and I can’t wait to share how effortless and rewarding it is!
Ingredients You’ll Need
Gathering the right ingredients is the first step toward cookie perfection, and this recipe calls for simple pantry staples that work in harmony to create irresistible sugar cookies. Each component plays an essential role, from providing structure to adding fluffy texture and that classic buttery flavor.
- 2 1/2 cups all-purpose flour: The foundation that gives structure to your cookies and keeps them tender yet sturdy.
- 3/4 teaspoon baking powder: Helps your cookies rise gently, ensuring a light texture without puffing up too much.
- 1/4 teaspoon salt: Enhances all the flavors and balances the sweetness perfectly.
- 3/4 cup unsalted butter, softened: Provides richness and that melt-in-your-mouth softness every sugar cookie craves.
- 3/4 cup granulated sugar: Sweetens the dough, creating that classic sugar cookie taste and gentle caramelization.
- 1 large egg: Binds everything together and contributes to the cookie’s tender texture.
- 1 tablespoon milk: Keeps the dough moist and easy to roll out for those perfect shapes.
- 1 teaspoon vanilla extract: Adds warm, aromatic notes that perfume the dough beautifully.
- Optional royal icing or buttercream for decorating: Because what’s a cut-out cookie without a little festive flair and personalization?
How to Make Cut Out Sugar Cookie Recipe
Step 1: Mix your dry ingredients
Start by whisking together the all-purpose flour, baking powder, and salt in a medium bowl. This ensures even distribution of the rising agent and seasoning, which is vital for consistent texture throughout the batch. Taking a moment at this stage sets you up for success down the road.
Step 2: Cream butter and sugar
In a larger bowl, beat the softened butter and granulated sugar until the mixture becomes light, fluffy, and pale in color. This usually takes about 2 to 3 minutes and is essential because it incorporates air into the dough, resulting in tender cookies rather than dense ones. You’ll notice this is when the magic really starts.
Step 3: Add wet ingredients
Next, mix in the egg, milk, and vanilla extract until everything is just combined. The addition of the egg and milk not only adds moisture but also helps to bind the dough, making it easier to handle. Be careful not to overmix; gentle folding keeps the cookies tender.
Step 4: Combine wet and dry ingredients
Gradually add the flour mixture to the wet ingredients, mixing just until the dough begins to come together. Overworking can develop gluten, which makes cookies tough, so stop as soon as you see the dough form a cohesive mass—soft but firm enough to roll out smoothly.
Step 5: Chill your dough
Divide your dough in half, shape each into a disc, and wrap tightly in plastic wrap. Refrigerate these for at least one hour. This chilling step is crucial for preventing the cookies from spreading too much and helps the flavors meld beautifully. Plus, it makes the dough easier to roll out into those crisp edges you want in your cut-outs.
Step 6: Cut and bake
Preheat your oven to 375°F and line a couple of baking sheets with parchment paper. Lightly flour your work surface and roll out one disc of dough to about 1/4 inch thickness. Use your favorite cookie cutters to stamp out delightful shapes—holiday themes, animals, stars, or anything your heart desires. Place the cookies about an inch apart on the prepared pans. Bake for 8 to 10 minutes until the edges just start to turn golden, signaling perfect doneness. Let them cool on the sheets for 5 minutes before transferring to a wire rack to cool fully.
Step 7: Decorate as desired
Once your cookies are completely cooled, it’s time for the fun part: decorating! Whether you prefer the smooth finish of royal icing or the creamy richness of buttercream, this recipe provides a sturdy canvas for any design. Get creative and let your personality shine through!
How to Serve Cut Out Sugar Cookie Recipe

Garnishes
Simple garnishes like colored sugar sprinkles, nonpareils, or edible glitter add sparkle and charm to your cut-outs. Freshly grated lemon zest can brighten the flavor just a touch before baking, adding a subtle zing behind the vanilla. Personalized piping work in festive colors instantly transforms these into party showstoppers.
Side Dishes
These cookies pair beautifully with a mug of hot cocoa, a cup of spiced tea, or even a chilled glass of milk. Serving them alongside fruit preserves or a rich chocolate dip can elevate the experience and offer complementary flavors that guests will adore.
Creative Ways to Present
Stack your decorated cookies tied with a festive ribbon for a charming gift or display them standing up in decorative jars or cookie tins. Using edible markers or stamping with food coloring lets you customize messages or designs, perfect for birthdays, holidays, or thank-you treats.
Make Ahead and Storage
Storing Leftovers
Store any leftover cookies in an airtight container at room temperature for up to a week. Layer them with parchment paper to prevent sticking and maintain their crisp edges without losing moisture inside.
Freezing
This Cut Out Sugar Cookie Recipe is freezer-friendly! Freeze the dough wrapped tightly before rolling or the fully baked cookies after decorating. Dough can last up to three months frozen, making it easy to bake fresh cookies on demand.
Reheating
If you want to enjoy your sugar cookies warm, pop them in a 300°F oven for 5 minutes or microwave for just a few seconds. This refreshes their softness without overbaking, recreating that fresh-from-the-oven feeling.
FAQs
Can I use margarine instead of butter in this Cut Out Sugar Cookie Recipe?
Butter is preferred because it creates the best flavor and texture, but margarine can be used in a pinch. Be aware the taste and spreading properties may differ slightly.
Why is chilling the dough important for this Cut Out Sugar Cookie Recipe?
Chilling firm ups the dough so the cookies hold their shape during baking and prevents excessive spreading. It also enhances the flavor development behind the scenes.
Can I add almond extract to the recipe?
Absolutely! Almond extract is a delightful addition that adds a lovely nutty aroma and pairs wonderfully with vanilla in sugar cookies.
How thick should I roll the dough for cut out cookies?
Rolling to about 1/4 inch thickness is ideal to ensure cookies are sturdy enough for handling and decorating but not too thick to bake unevenly.
What’s the best way to decorate cut out sugar cookies?
Royal icing dries hard and is perfect for intricate designs, while buttercream offers a soft, creamy finish. Both allow for endless creativity depending on your preference.
Final Thoughts
There’s something truly special about making these Cut Out Sugar Cookie Recipes that will brighten any occasion and bring joy to your kitchen. The simple ingredients, straightforward steps, and endless decorating possibilities make it a delicious project you’ll want to return to again and again. I hope you dive into this recipe and discover the warmth and fun that baking homemade sugar cookies can bring to your life!
Print
Cut Out Sugar Cookie Recipe
- Prep Time: 20 minutes (plus 1 hour chill time)
- Cook Time: 10 minutes
- Total Time: 1 hour 30 minutes
- Yield: 24 cookies
- Category: Dessert
- Method: Baking
- Cuisine: American
- Diet: Vegetarian
Description
This classic Cut Out Sugar Cookie recipe yields perfectly soft and buttery cookies ideal for decorating and sharing during holidays or any special occasion. The dough is chilled to prevent spreading, rolled out, and cut into charming shapes before baking to golden edges, resulting in a tender bite that pairs beautifully with royal icing or buttercream decorations.
Ingredients
Dry Ingredients
- 2 1/2 cups all-purpose flour
- 3/4 tsp baking powder
- 1/4 tsp salt
Wet Ingredients
- 3/4 cup unsalted butter, softened
- 3/4 cup granulated sugar
- 1 large egg
- 1 tbsp milk
- 1 tsp vanilla extract
Optional for Decorating
- Royal icing or buttercream
Instructions
- Mix Dry Ingredients: In a medium bowl, whisk together the all-purpose flour, baking powder, and salt until evenly combined to ensure consistent texture in the cookies.
- Cream Butter and Sugar: In a large bowl, beat the softened butter and granulated sugar together using an electric mixer until the mixture is light and fluffy, about 2 to 3 minutes, to incorporate air and give the cookies a tender crumb.
- Add Wet Ingredients: Mix in the egg, milk, and vanilla extract until fully combined, creating a smooth and homogenous dough base.
- Combine Dry and Wet Mixtures: Gradually add the dry ingredient mixture to the wet ingredients, mixing just until the dough comes together. Avoid overmixing to keep the cookies tender.
- Chill the Dough: Divide the dough in half and shape each half into a disc. Wrap tightly in plastic wrap and chill in the refrigerator for at least one hour. This step prevents the cookies from spreading too much during baking.
- Preheat Oven and Prepare Baking Sheets: Preheat your oven to 375°F (190°C) and line baking sheets with parchment paper to prevent sticking and promote even baking.
- Roll and Cut Dough: On a lightly floured surface, roll out one dough disc to about 1/4-inch thickness. Use cookie cutters to cut into desired shapes and place the cookies about 1 inch apart on the prepared baking sheets.
- Bake the Cookies: Bake the cookies in the preheated oven for 8 to 10 minutes, or until the edges just start to turn golden brown, indicating they are cooked but still tender inside.
- Cool the Cookies: Let the cookies cool on the baking sheet for 5 minutes to firm up, then transfer them to a wire rack to cool completely before decorating.
- Decorate: Once fully cooled, decorate the cookies using royal icing or buttercream as desired to create festive and beautiful designs.
Notes
- Chilling the dough thoroughly helps prevent the cookies from spreading during baking and improves texture.
- You can freeze unbaked cut-outs by placing them on a baking sheet and then transferring them to a freezer bag after firm. They can also freeze baked cookies for later enjoyment.
- Adding a splash of almond extract enhances the flavor with a subtle nutty note if desired.
