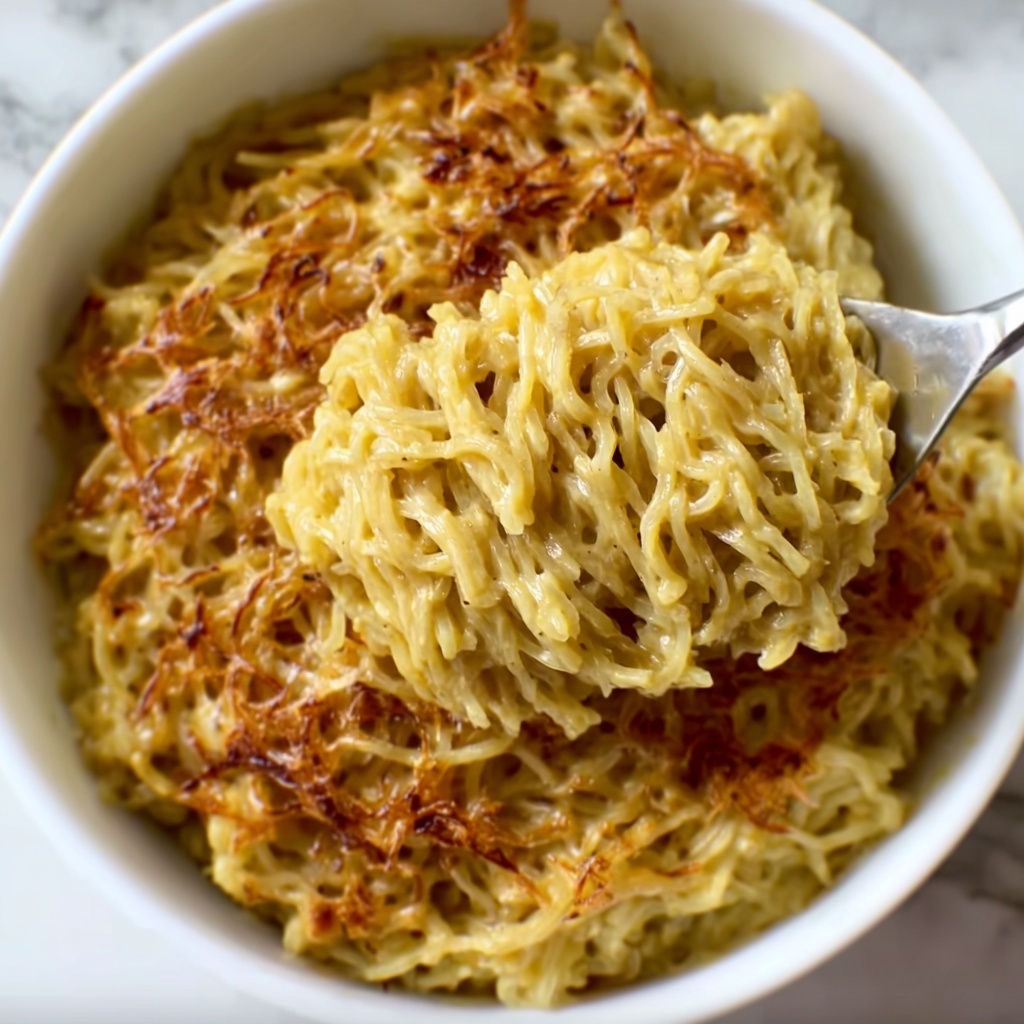
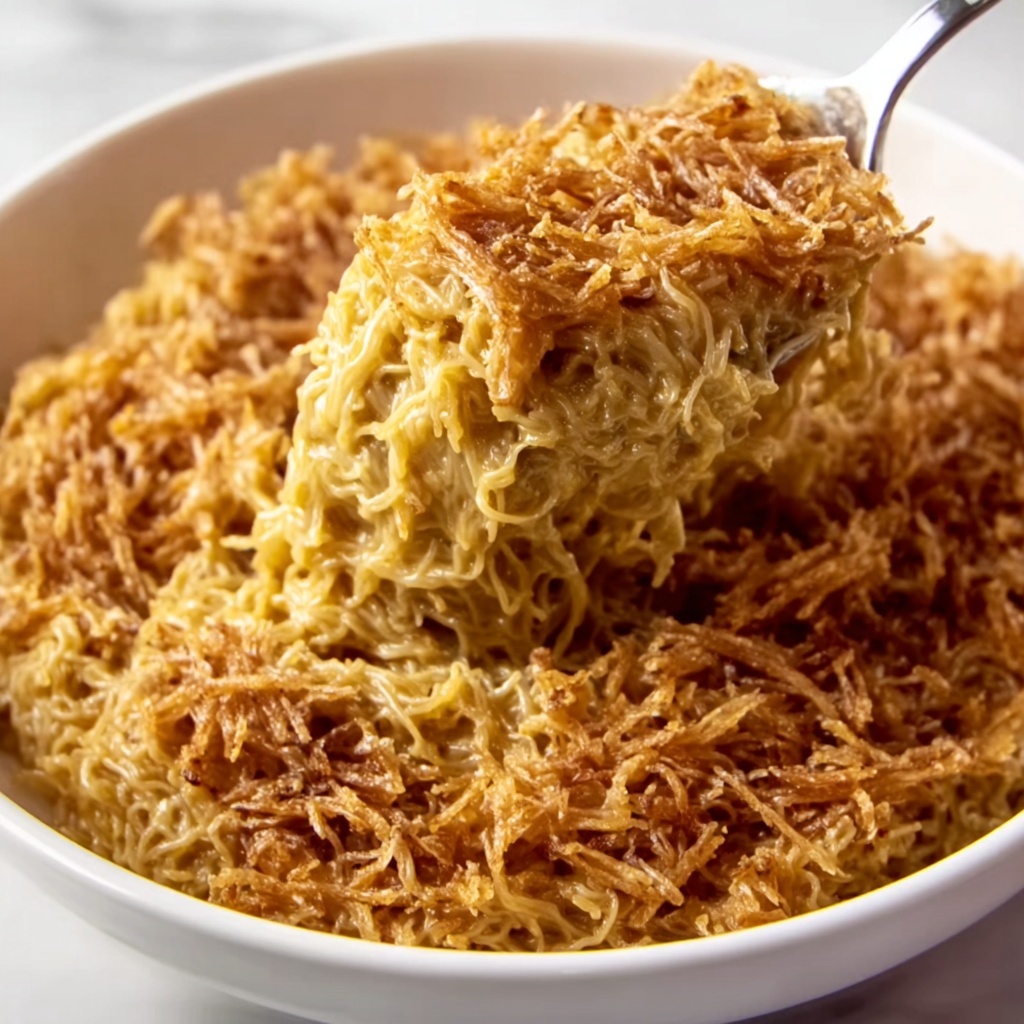
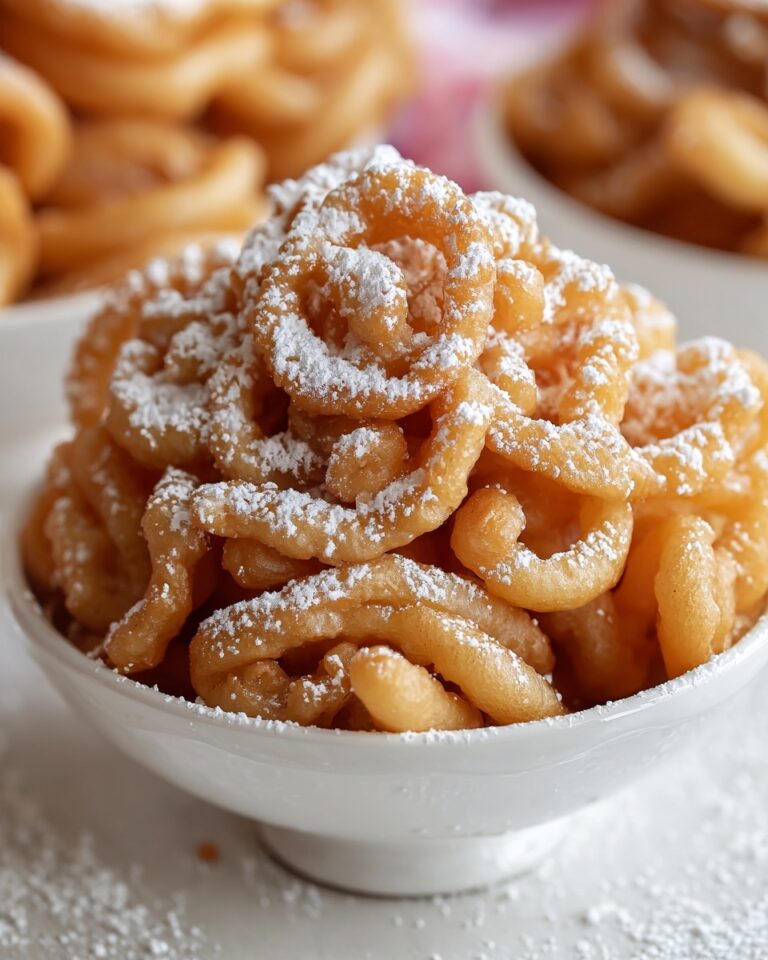
If you’re looking for a dessert that effortlessly combines crispy texture with luscious chocolate decadence, you have to try this Crunchy Kataifi Dubai Chocolate Bar Filling Recipe. This delightful treat features golden, flaky kataifi nests wrapped around a rich, creamy chocolate filling that melts in your mouth. The balance of crunchy shredded phyllo dough and silky chocolate ganache, complemented by a subtle sweetness from optional syrup, makes it a show-stopping dessert perfect for sharing with friends and family. Once you get a taste of this, it’ll quickly become a beloved recipe in your collection.
Ingredients You’ll Need
These ingredients are simple yet essential to create the perfect blend of texture and flavor in this recipe. Each one plays a special role, whether it’s adding crispiness, smoothness, sweetness, or an aromatic touch.
- Kataifi dough: The star ingredient providing light and flaky shredded phyllo that crisps beautifully when baked.
- Unsalted butter: Melted butter enriches the dough and ensures a golden, crisp finish.
- Sugar: Optional, but adds a gentle sweetness that enhances the dough’s flavor without overpowering it.
- Chocolate bars: Choose your favorite dark, milk, or a combination for a luscious filling that melts perfectly.
- Heavy cream: Softens the chocolate into a smooth, silky ganache filling.
- Vanilla extract: Optional, but adds depth and warmth to the chocolate flavor.
- Honey: Also optional, perfect for natural sweetness and a touch of floral nuance.
- Water: Needed for making the optional syrup that adds a lovely moistness and shine.
- Lemon juice or rosewater: Optional, brings a bright or fragrant note to the syrup for extra complexity.
How to Make Crunchy Kataifi Dubai Chocolate Bar Filling Recipe
Step 1: Preparing the Kataifi Dough
Preheat your oven to 350°F (175°C). Gently separate the kataifi dough strands with your hands to loosen them, then place the dough in a large bowl. Drizzle the melted butter over the dough and gently toss to coat each strand evenly. If you prefer a slightly sweeter dough, stir in 2 tablespoons of sugar now. This step is crucial because it ensures your kataifi bakes up so crunchy and golden, creating the perfect shell for the filling.
Step 2: Making the Chocolate Filling
In a small saucepan, warm the heavy cream on low heat until just warm—be careful not to boil. Break the chocolate bars into pieces and add them to the cream, stirring continuously until the chocolate melts smoothly into a rich ganache. Remove from heat and stir in vanilla extract and honey if using. This rich filling will be the luscious heart of your kataifi, balancing beautifully with the crispy exterior.
Step 3: Assembling the Kataifi Nests
Take small handfuls of the kataifi dough and gently form them into nests or small bundles about 2 inches in diameter. Place the nests on a parchment-lined baking tray and press a small indentation in the center of each one to hold the chocolate filling. This shaping makes sure each bite has a perfect crunch-to-cream ratio.
Step 4: Filling and Baking
Spoon a generous dollop of the melted chocolate filling into the center of each kataifi nest. Once all are filled, bake in the preheated oven for 15-20 minutes until the dough turns beautifully golden and crispy. The aroma filling your kitchen at this point is pure magic and signals that your crunchy chocolate delight is almost ready!
Step 5: Preparing the Optional Syrup
While the kataifi are baking, prepare the syrup by combining water, sugar, and lemon juice or rosewater (if you want to add floral or citrus notes) in a small saucepan. Simmer for 5-7 minutes until slightly thickened and then cool it to room temperature. Drizzling this syrup over the finished kataifi adds an irresistible glossy finish and a touch of sweetness that elevates the dessert.
How to Serve Crunchy Kataifi Dubai Chocolate Bar Filling Recipe

Garnishes
Sprinkle some finely chopped pistachios or toasted almonds on top for added crunch and an inviting pop of color. You can also dust with powdered sugar or cocoa for a delicate, elegant touch. Fresh berries or edible rose petals can enhance the presentation and introduce a subtle fresh note.
Side Dishes
Pair your kataifi with a scoop of vanilla bean ice cream or a dollop of whipped cream for a creamy counterbalance. A cup of strong coffee or mint tea is also ideal for soaking in the rich flavors and balancing sweetness after a hearty meal.
Creative Ways to Present
Serve individual nests on decorative spoons as a fun party appetizer or arrange them on a dessert platter lined with banana leaves or colorful doilies for a festive flair. You can also drizzle additional melted chocolate or a caramel sauce artistically for an eye-catching impression.
Make Ahead and Storage
Storing Leftovers
If you have leftovers, store them in an airtight container at room temperature for up to two days to maintain their crunchiness. Avoid refrigeration unless your environment is very warm, as moisture could soften the kataifi.
Freezing
The kataifi nests can be frozen before baking. Place them on a baking sheet until firm, then transfer to a freezer-safe container. Freeze for up to 1 month. When ready to bake, add a few extra minutes to the baking time and bake straight from frozen for fresh, crispy results.
Reheating
To reheat, warm them in a preheated oven at 320°F (160°C) for about 5-7 minutes to restore crispness and gently warm the filling. Avoid microwaving as it will soften the kataifi and make it soggy.
FAQs
Can I use other types of chocolate bars for the filling?
Absolutely! Dark, milk, or even white chocolate bars work wonderfully. Mixing different types can create a more complex flavor profile.
Where can I buy kataifi dough?
Kataifi dough is typically found in Middle Eastern or Mediterranean grocery stores. Some well-stocked international markets or online retailers also carry it.
Is the syrup mandatory for the recipe?
Not at all. The syrup is optional but adds a lovely extra sweetness and moisture that complements the crunchy kataifi and rich chocolate beautifully.
Can I make this recipe vegan?
Yes, by substituting the butter with a vegan margarine and using dairy-free chocolate and cream alternatives, you can enjoy a vegan-friendly version of this dessert.
How long does it take to prepare this recipe?
From start to finish, including baking and optional syrup preparation, expect about 35 minutes. It’s quite quick for such a decadent and impressive dessert!
Final Thoughts
This Crunchy Kataifi Dubai Chocolate Bar Filling Recipe is one of those rare, delightful treats that feels both special and approachable. The combination of crisp kataifi and velvety chocolate filling will captivate anyone lucky enough to try it. Whether you’re making it for a festive occasion or just to treat yourself, I encourage you to dive in and share the joy this unique dessert brings—it’s sure to become a new favorite in your kitchen!
Print
Crunchy Kataifi Dubai Chocolate Bar Filling Recipe
- Prep Time: 15 minutes
- Cook Time: 20 minutes
- Total Time: 35 minutes
- Yield: 12 pieces
- Category: Dessert
- Method: Baking
- Cuisine: Middle Eastern
Description
Crunchy Kataifi Dubai Chocolate Bar Filling is a delightful Middle Eastern-inspired dessert featuring crispy kataifi dough nests filled with rich melted chocolate. This recipe offers a perfect blend of buttery, flaky kataifi dough and smooth chocolate filling, enhanced with an optional sweet syrup drizzle. Ideal for serving warm or at room temperature, it provides a decadent treat perfect for special occasions or everyday indulgence.
Ingredients
Kataifi Dough
- 1 package of kataifi dough (shredded phyllo dough, usually available at Middle Eastern or international grocery stores)
- 4 tablespoons unsalted butter, melted
- 2 tablespoons sugar (optional, for added sweetness)
Chocolate Filling
- 4 large chocolate bars (about 4 oz each; dark, milk, or a combination)
- 2 tablespoons heavy cream
- 1 teaspoon vanilla extract (optional)
- 1 tablespoon honey (optional)
Syrup (Optional)
- 1/2 cup water
- 1/2 cup sugar
- 1 teaspoon lemon juice or rosewater (optional)
Instructions
- Prepare the Kataifi Dough: Preheat your oven to 350°F (175°C). Gently pull apart the kataifi dough, loosening it to separate the strands, and place the dough in a bowl.
- Coat the Dough: Drizzle melted butter over the kataifi dough and toss to coat evenly. For a sweeter dough, mix in 2 tablespoons of sugar and combine well.
- Make the Chocolate Filling: In a small saucepan, heat heavy cream over low heat until just warm without boiling. Break the chocolate bars into pieces and add them to the warm cream, stirring continuously until fully melted and smooth.
- Enhance the Chocolate: Remove from heat and stir in vanilla extract and honey if using. Set the chocolate filling aside to cool slightly.
- Form Kataifi Nests: Take small portions of the kataifi dough and shape them into nests or bundles approximately 2 inches in size. Place each nest on a parchment-lined baking tray.
- Create Filling Space: Press gently in the center of each kataifi nest to make a shallow cavity for the chocolate filling.
- Fill the Kataifi: Spoon a small amount of the melted chocolate filling into the center of each kataifi bundle carefully.
- Bake Kataifi: Place the baking tray in the preheated oven and bake for 15-20 minutes, or until the kataifi dough turns golden brown and crispy.
- Prepare the Syrup (Optional): While baking, combine water, sugar, and lemon juice or rosewater in a small saucepan. Bring to a simmer and cook for 5-7 minutes until syrup thickens slightly. Remove from heat and let cool to room temperature.
- Serve and Enjoy: After baking, allow the kataifi to cool for a few minutes. Optionally drizzle the syrup over the crispy sweets before serving warm or at room temperature.
Notes
- For extra crunch, ensure the kataifi dough is well coated with melted butter before baking.
- Adjust the sweetness by adding or omitting sugar in the dough and syrup according to taste.
- Use a mix of dark and milk chocolate bars to balance richness and sweetness.
- Handle kataifi dough gently to avoid breaking the delicate strands.
- The syrup is optional but adds a lovely moist texture and aromatic flavor.
- Serve freshly baked for best texture; leftovers can be stored in an airtight container for up to 2 days.


