
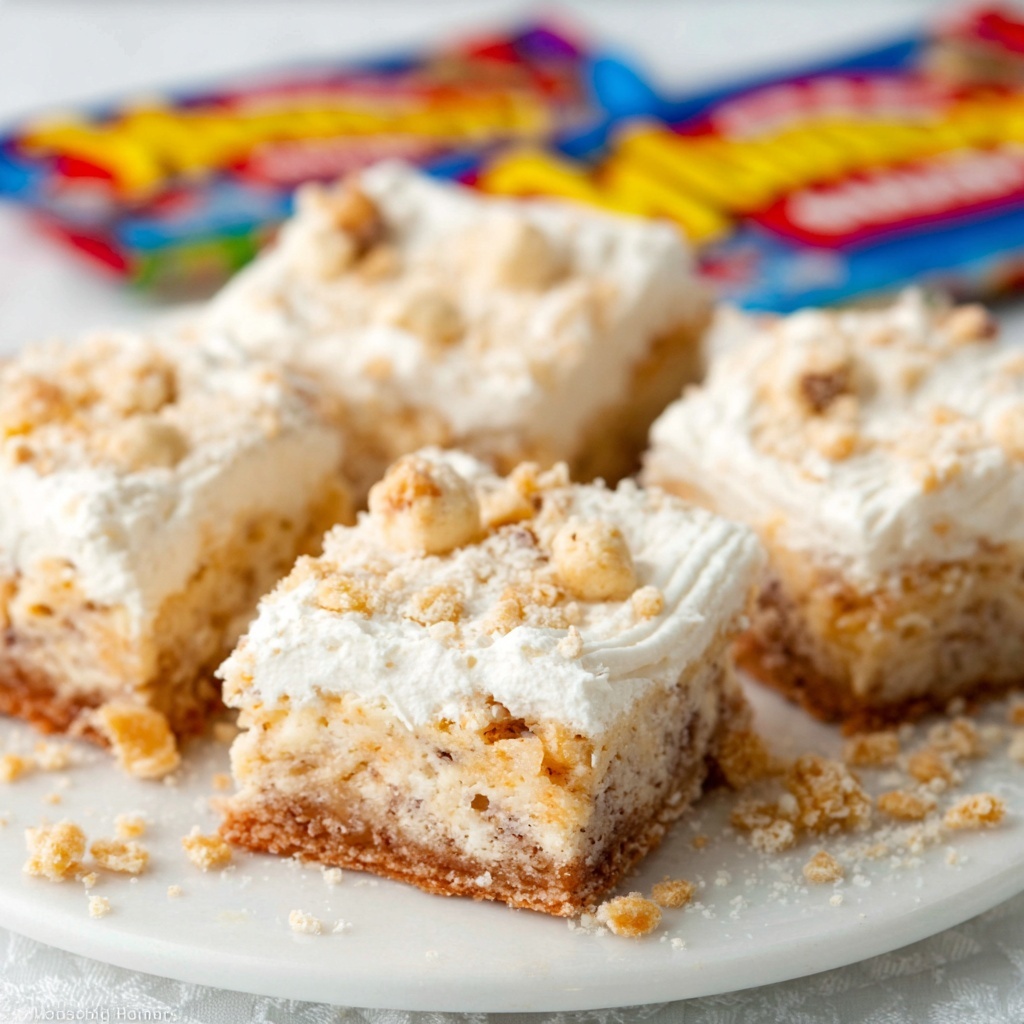
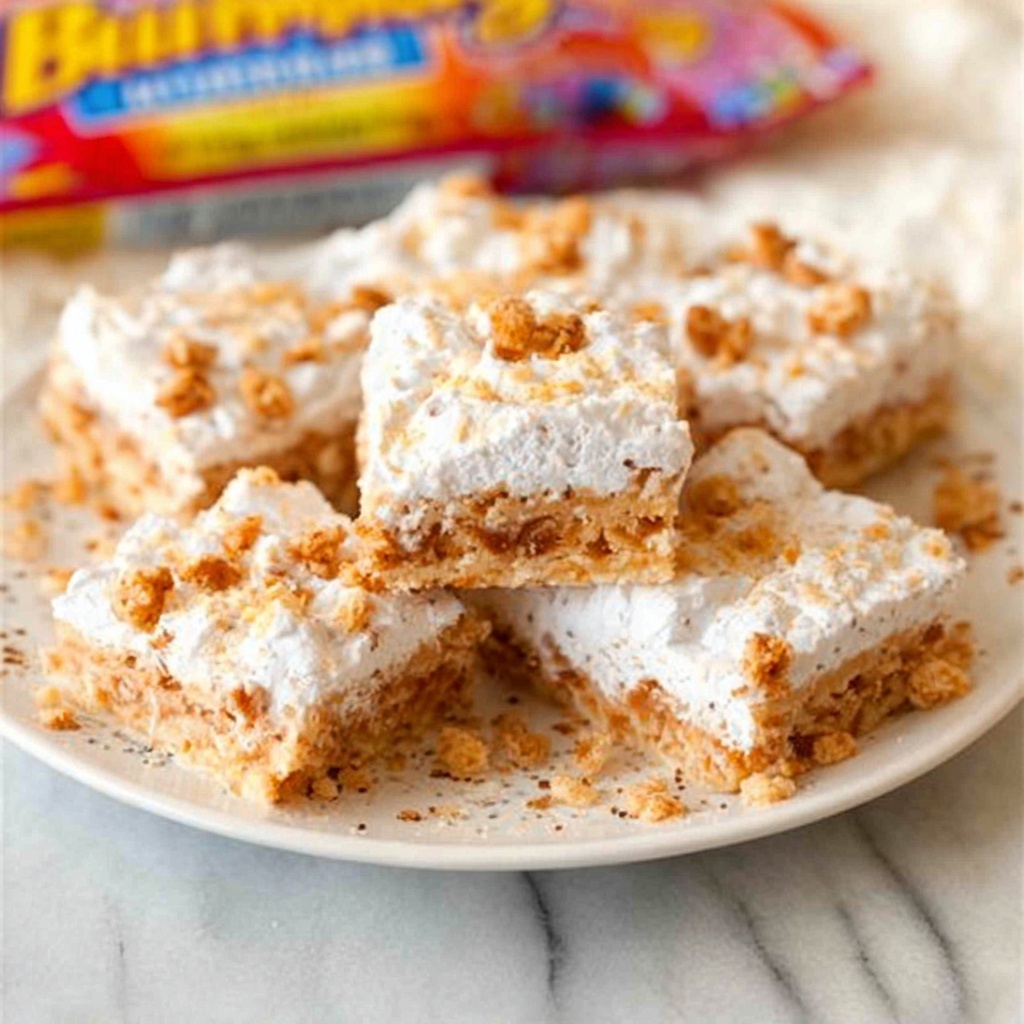
If you are a fan of sweet, creamy, and delightfully crunchy treats, then the Butterfinger Dreams: Cream Cheese Shortbread Bars with Whipped Butterfinger Topping Recipe is going to be your new obsession. This irresistible dessert combines the rich, buttery texture of cream cheese shortbread with the playful crunch of crushed Butterfinger candy bars, all topped with a light and fluffy whipped cream that’s studded with even more candy goodness. Every bite is a dreamy balance of smooth, crumbly, and crisp textures, making these bars the perfect indulgence for any occasion.
Ingredients You’ll Need
This recipe calls for simple, everyday ingredients that come together to create layers of flavor and texture that feel anything but ordinary. Each ingredient plays a vital role in crafting the perfect Cream Cheese Shortbread base and the luscious whipped topping that finishes these bars off beautifully.
- Powdered sugar: Adds sweetness and helps achieve a smooth texture in both the crust and the whipped topping.
- All-purpose flour: The classic base for shortbread, providing structure and a buttery crumb.
- Cream cheese (at room temperature): Brings creamy richness and moisture to the shortbread, making it extra tender.
- Butter (at room temperature): Essential for that melt-in-your-mouth shortbread texture and buttery flavor.
- Butterfinger candy bars (crushed and divided): The star of the show—crunchy, peanut buttery candy pieces add irresistible texture and flavor.
- Heavy whipping cream: Creates the airy, luscious whipped topping that perfectly complements the shortbread.
How to Make Butterfinger Dreams: Cream Cheese Shortbread Bars with Whipped Butterfinger Topping Recipe
Step 1: Prepare Your Pan and Preheat the Oven
Preheat your oven to 350 degrees Fahrenheit and lightly spray a 9-inch square pan with cooking spray. This step ensures your bars won’t stick, and your oven is at the perfect temperature to bake the shortbread evenly and to a delicate golden finish.
Step 2: Combine Your Dry Ingredients and Cut in the Cream Cheese and Butter
In a large bowl, stir together 1½ cups powdered sugar and the flour until evenly mixed. Use a pastry cutter or fork to cut the cream cheese and butter into this mixture until it resembles a crumbly, sandy texture. This technique is key to getting those tender crumbs that make shortbread so divine. Next, gently fold in 1 cup of the crushed Butterfinger pieces, distributing those crunchy nuggets throughout the dough.
Step 3: Press and Bake the Shortbread Base
Press the prepared dough evenly into your sprayed pan, making sure the surface is smooth and compacted. Bake for 30 minutes until the edges are golden and the center is set. Once baked, remove the pan from the oven and allow it to cool completely. Patience here is important to ensure the creamy topping won’t melt when added later.
Step 4: Whip Up the Heavenly Butterfinger Topping
In a chilled bowl, whip together the heavy whipping cream and 3 tablespoons of powdered sugar using a handheld electric mixer. Whip until the cream forms stiff peaks—this creates the light, airy texture that contrasts so beautifully with the dense shortbread. Gently fold in the remaining crushed Butterfinger pieces, then spread this luscious topping over the cooled shortbread base, coating it evenly for that perfect finish.
Step 5: Chill and Slice Into Bars
Once your bars are topped, place the pan in the refrigerator to chill for at least an hour. This allows the topping to set and the flavors to meld together. When ready, slice the dessert into 16 decadent squares, each bursting with Butterfinger bliss.
How to Serve Butterfinger Dreams: Cream Cheese Shortbread Bars with Whipped Butterfinger Topping Recipe
Garnishes
To elevate your serving experience, consider a light dusting of powdered sugar or a few extra chunks of crushed Butterfinger on top for that photo-ready presentation. A drizzle of melted chocolate can also add a rich, glossy accent that pairs stunningly with the peanut butter flavors.
Side Dishes
These bars are a perfect standalone treat, but if you want to serve them alongside something, a scoop of vanilla or caramel ice cream is a fantastic choice. The creamy coolness of the ice cream enhances the richness of the shortbread and makes for a truly indulgent dessert plate.
Creative Ways to Present
Try serving these bars on a rustic wooden board with cups of coffee or tea for a cozy get-together. Wrapping individual squares in parchment paper tied with twine makes them a charming edible gift for friends and family. If you’re feeling festive, place them on a tiered tray with other finger desserts for a party spread that’s sure to impress.
Make Ahead and Storage
Storing Leftovers
Keep your Butterfinger Dreams bars in an airtight container in the refrigerator. They stay fresh and delicious for up to 4 days, making them perfect for meal prep or a quick sweet snack during the week. The chilled environment also helps keep the whipped topping stable and fluffy.
Freezing
You can freeze these bars by wrapping them tightly in plastic wrap and placing them in a freezer-safe container. Freeze for up to 2 months. When ready to enjoy, thaw overnight in the refrigerator to retain the creamy texture and candy crunch.
Reheating
Because these bars rely on a whipped cream topping, reheating is not recommended. Instead, serve them chilled to enjoy the full creamy, crunchy texture that makes this recipe so special.
FAQs
Can I use a different candy bar instead of Butterfinger?
Absolutely! While Butterfinger candy bars provide a unique peanut buttery crunch, feel free to experiment with Twix, Heath bars, or even chopped Snickers. Just keep in mind that each will alter the flavor profile slightly.
Is it important to have the cream cheese and butter at room temperature?
Yes, having the cream cheese and butter softened helps you mix the ingredients smoothly and ensures the crumbly texture of the shortbread comes out perfectly tender rather than dense.
Can I make the shortbread base ahead of time?
Definitely! You can bake the shortbread base a day in advance and store it in the refrigerator while you prepare the topping right before serving. This helps streamline the process, especially for gatherings.
What’s the best way to crush the Butterfinger bars?
Place the Butterfinger bars in a sealed plastic bag and gently crush them with a rolling pin or a heavy pan. This method keeps the candy pieces nicely sized and prevents a mess.
Can I use whipped topping from a can instead of homemade whipped cream?
While canned whipped topping can work in a pinch, homemade whipped cream provides a fresher flavor and better texture that perfectly balances the dense shortbread and crunchy candy.
Final Thoughts
This Butterfinger Dreams: Cream Cheese Shortbread Bars with Whipped Butterfinger Topping Recipe is one of those treats that bring joy with every bite. It’s easy to make yet feels incredibly special, offering a mouthwatering combination of flavors and textures that’s tough to beat. I can’t wait for you to try this recipe and experience firsthand what makes it a beloved favorite for family, friends, and anyone lucky enough to share it. Happy baking!
Print
Butterfinger Dreams: Cream Cheese Shortbread Bars with Whipped Butterfinger Topping Recipe
- Prep Time: 15 minutes
- Cook Time: 30 minutes
- Total Time: 45 minutes
- Yield: 16 bars
- Category: Dessert
- Method: Baking
- Cuisine: American
Description
Butterfinger Dreams is a delectable dessert bar featuring a buttery shortbread crust studded with crushed Butterfinger candy bars, topped with a fluffy homemade whipped cream and Butterfinger topping. These bars combine creamy, crunchy, and sweet flavors for a perfect treat loved by candy and dessert enthusiasts alike.
Ingredients
Crust and Base
- 1½ cups powdered sugar
- 1 cup all-purpose flour
- 1 (8-oz) package cream cheese, at room temperature
- ½ cup butter, at room temperature
- 1 cup crushed Butterfinger candy bars (from 5 bars, divided)
Topping
- 1 cup heavy whipping cream
- 3 Tbsp powdered sugar
- Remaining 1 cup crushed Butterfinger candy bars
Instructions
- Prepare the Pan: Preheat your oven to 350°F (175°C). Lightly spray a 9-inch square baking pan with cooking spray to prevent sticking.
- Make the Crust: In a bowl, combine 1½ cups powdered sugar and 1 cup all-purpose flour. Use a pastry cutter or fork to cut in the cream cheese and butter until the mixture becomes crumbly. Stir in 1 cup of crushed Butterfinger candy bars. Press this mixture evenly into the prepared baking pan to form the crust.
- Bake the Crust: Bake the crust in the preheated oven for 30 minutes. Once baked, remove from the oven and allow it to cool completely to room temperature before adding the topping.
- Prepare the Topping: Using a hand-held electric mixer, whip the heavy cream and 3 tablespoons powdered sugar together until stiff peaks form. Gently fold in the remaining 1 cup of crushed Butterfinger candy bars into the whipped cream mixture.
- Assemble and Chill: Spread the whipped cream and Butterfinger mixture evenly over the cooled crust. Cut into 16 bars and store the finished Butterfinger Dreams bars in the refrigerator until ready to serve to maintain freshness.
Notes
- Ensure the cream cheese and butter are at room temperature for easier mixing and better texture.
- Cool the crust completely before adding the whipped topping to prevent it from melting or becoming watery.
- Store bars in an airtight container in the refrigerator for up to 3 days for best freshness.
- Use a sharp knife to cut the bars for clean squares.
- For a lighter version, you can substitute reduced-fat cream cheese and lower-fat whipped cream, but it might slightly alter the texture and richness.


