
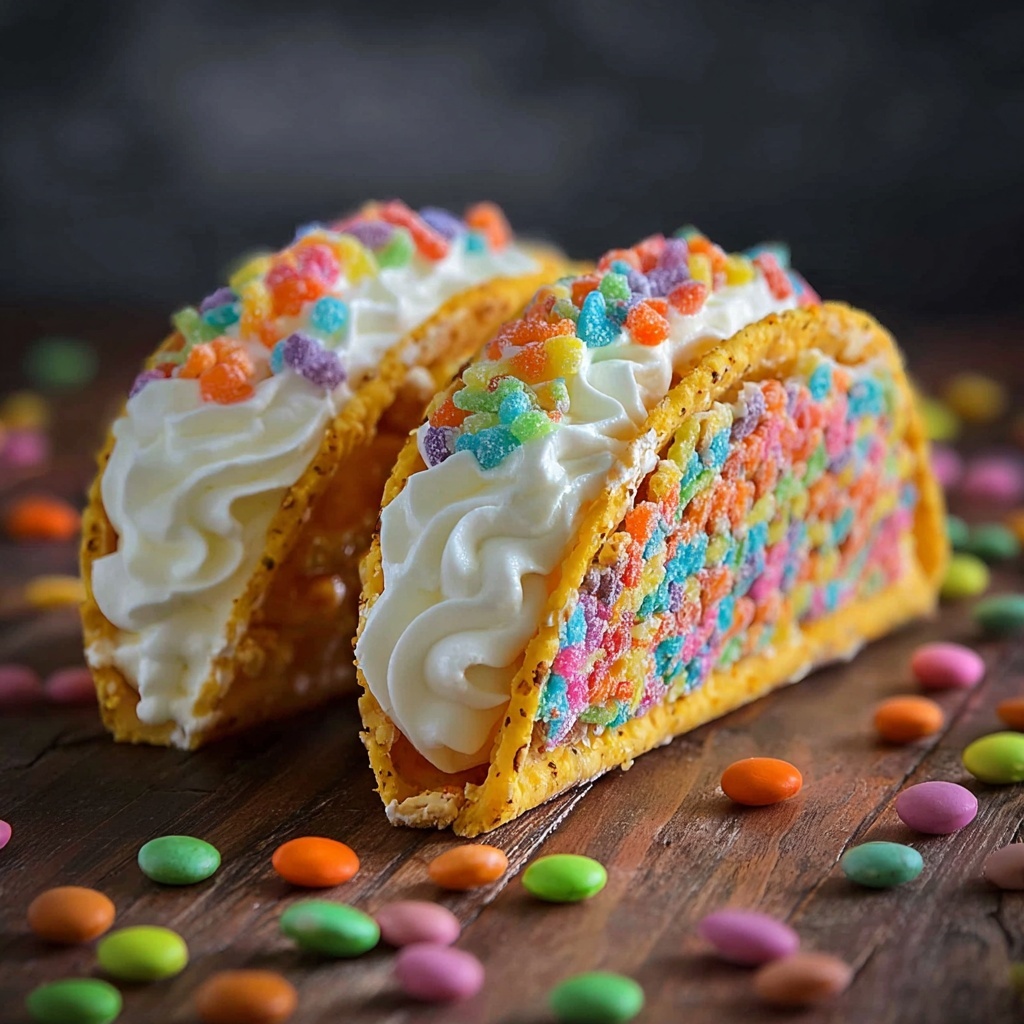
If you have a sweet tooth and a love for playful, colorful treats, the Fruity Pebbles Cheesecake Tacos Recipe will instantly become your go-to dessert. This fun and vibrant dish transforms the nostalgic crunch of Fruity Pebbles cereal into a crispy taco shell that holds a luscious, creamy cheesecake filling. Every bite offers a delightful contrast of textures and flavors that feel both indulgent and lighthearted. It’s a showstopper at parties or a cheerful ending to any meal, making dessert as joyful as it is delicious.

Ingredients You’ll Need
This recipe keeps things wonderfully simple with just a handful of essential ingredients. Each one plays a crucial role in building the layers of flavor, texture, and that irresistible pop of color that makes these cheesecake tacos so special.
- 3 cups colorful Fruity Pebbles cereal: The star ingredient, providing crunch and vibrant color to form the taco shells.
- ½ cup unsalted butter, melted: Acts as the binding agent to hold the cereal taco shells together with a rich, buttery flavor.
- 8 oz cream cheese, softened: Creates a smooth and creamy base for the cheesecake filling.
- ½ cup powdered sugar, sifted: Adds just the right amount of sweetness to balance the tanginess of the cream cheese.
- 1 tsp pure vanilla extract: Enhances the cheesecake filling with warm, aromatic notes.
- 1 cup whipped cream: Lightens the cheesecake filling for an airy texture that melts in your mouth.
- Additional Fruity Pebbles cereal for garnish: Gives a fun and colorful finishing touch on top of each taco.
How to Make Fruity Pebbles Cheesecake Tacos Recipe
Step 1: Prepare the Fruity Pebbles Cereal Shells
Start by mixing the colorful Fruity Pebbles with melted butter in a large bowl, making sure every pebble is coated evenly. This step is crucial for forming sturdy but crunchy taco shells that hold their shape. Next, firmly press this mixture into taco-shaped molds or a muffin tin, aiming for a thickness of about a quarter inch to create a perfect crisp shell. Pop them in the fridge to chill for at least 30 minutes until they set solid.
Step 2: Make the Cheesecake Filling
While the shells chill, whip up the creamy cheesecake filling. Beat the softened cream cheese until it’s smooth and fluffy, about two minutes using an electric mixer. Then slowly add the powdered sugar and vanilla extract, blending well and scraping down the sides to ensure everything’s fully incorporated. This process builds the rich, sweet base for your filling.
Step 3: Fold in the Whipped Cream
To keep the cheesecake filling light and airy, gently fold in the whipped cream until just combined. This step is key to giving your filling that soft, dreamy texture, so be gentle and avoid overmixing.
Step 4: Assemble the Tacos
Spoon or pipe the cheesecake filling into the chilled Fruity Pebbles shells, generously filling them so the cheesecake slightly overflows for that extra indulgent look. Finally, sprinkle extra Fruity Pebbles on top and gently press them into the filling to decorate and add an extra crunch.
How to Serve Fruity Pebbles Cheesecake Tacos Recipe
Garnishes
Enhance the presentation of your Fruity Pebbles Cheesecake Tacos Recipe by adding brightly colored garnish. Fresh berries like raspberries or blueberries can complement the cereal’s fruity notes beautifully. A drizzle of chocolate or fruit syrup adds a decadent touch and pairs wonderfully with the creamy filling.
Side Dishes
Since these cheesecake tacos are rich and sweet, they pair well with light, refreshing side dishes. A crisp fruit salad or a tangy citrus sorbet balances the richness perfectly, making your dessert plate feel complete without overwhelming your palate.
Creative Ways to Present
For a party or fun gathering, serve these cheesecake tacos on a platter lined with colorful paper or edible flowers to highlight their playful vibe. You can also experiment with shapes by using cookie cutters to create mini taco shells for bite-size treats, perfect for sharing and sampling.
Make Ahead and Storage
Storing Leftovers
If you happen to have any leftovers, store them in an airtight container in the refrigerator. The taco shells will maintain their crunch for a few hours, but enjoy them within 24 hours to experience the full texture and flavor the Fruity Pebbles Cheesecake Tacos Recipe has to offer.
Freezing
Freezing is not recommended for these cheesecake tacos as the cereal shells may lose their crispness and become soggy upon thawing. For best results, prepare and enjoy fresh.
Reheating
Since these tacos are best served chilled, reheating is not necessary or advised. Instead, allow refrigerated cheesecake tacos to sit at room temperature for a few minutes if you prefer a slightly softer texture before serving.
FAQs
Can I make the Fruity Pebbles shells ahead of time?
Yes! You can prepare the Fruity Pebbles cereal shells a day before and keep them chilled in the fridge. Just assemble them with the filling right before serving to preserve the crunch.
Is this recipe gluten-free?
The Fruity Pebbles cereal used in this recipe is gluten-free, making this dessert a friendly option for those avoiding gluten. Always double-check your specific cereal brand to be sure.
Can I substitute the cream cheese?
While cream cheese is key to achieving the classic cheesecake flavor and texture, you could try mascarpone for a slightly sweeter and creamier filling. Keep in mind the texture may vary.
How do I get the taco shells to hold their shape?
Pressing the Fruity Pebbles mixture firmly into molds and chilling for at least 30 minutes ensures the shells solidify properly and hold their shape during filling and serving.
Can I add other mix-ins to the filling?
Absolutely! Feel free to fold in mini chocolate chips, chopped fresh fruit, or a swirl of jam to personalize your Fruity Pebbles Cheesecake Tacos Recipe while keeping the creamy texture intact.
Final Thoughts
There’s nothing quite like the joy of biting into a Fruity Pebbles Cheesecake Taco, where childhood nostalgia meets grown-up indulgence. This Fruity Pebbles Cheesecake Tacos Recipe is perfect for brightening any occasion with its cheerful colors and irresistible flavors. Give it a try—you might just find your new favorite dessert that makes every day feel like a celebration.
Print
Fruity Pebbles Cheesecake Tacos Recipe
- Prep Time: 15 minutes
- Cook Time: 0 minutes
- Total Time: 55 minutes
- Yield: 6 servings
- Category: Dessert
- Method: No-Cook
- Cuisine: American
- Diet: Vegetarian
Description
These Fruity Pebbles Cheesecake Tacos are a fun and colorful dessert that combines the crunch of cereal with creamy cheesecake filling. Using Fruity Pebbles cereal pressed into taco-shaped shells, topped with a light and fluffy cream cheese mixture, this no-bake treat is perfect for a party or a quick, delightful snack.
Ingredients
For the Taco Shells
- 3 cups colorful Fruity Pebbles cereal
- ½ cup unsalted butter, melted
For the Cheesecake Filling
- 8 oz cream cheese, softened
- ½ cup powdered sugar, sifted
- 1 tsp pure vanilla extract
- 1 cup whipped cream
For Garnish
- Additional Fruity Pebbles cereal
Instructions
- Prepare the Taco Shells: In a large bowl, combine the Fruity Pebbles cereal with the melted unsalted butter. Stir well until each piece of cereal is fully coated with butter to help them stick together when pressed.
- Form the Shells: Firmly press the coated cereal mixture into taco-shaped molds or a muffin tin, ensuring the thickness is about ¼ inch. Place them in the refrigerator and chill for at least 30 minutes, allowing the shells to set and become firm.
- Make the Cheesecake Filling: Using an electric mixer, beat the softened cream cheese on medium speed for about 2 minutes until it’s smooth and fluffy. Gradually add the sifted powdered sugar and vanilla extract, mixing continuously and scraping down the bowl as needed to incorporate everything evenly.
- Fold in Whipped Cream: Gently fold the whipped cream into the cream cheese mixture. Take care to combine just until mixed, preserving the light and airy texture of the filling for a creamy mouthfeel.
- Fill the Taco Shells: Spoon or pipe the cheesecake filling generously into the chilled cereal taco shells, filling them so they slightly overflow for a decadent look.
- Garnish and Serve: Top each cheesecake taco with a few additional Fruity Pebbles, pressing them lightly into the filling to ensure they stick. Serve these delightful desserts immediately or refrigerate them for up to 2 hours before enjoying.
Notes
- Pressing the cereal mixture firmly and chilling it well is key to forming sturdy taco shells that hold their shape.
- For easier filling, consider using a piping bag or resealable plastic bag with the corner cut off.
- These cheesecake tacos are best served within 2 hours of assembly for optimal texture.
- To soften cream cheese faster, leave it at room temperature for 30 minutes before starting.
- Feel free to experiment with other colorful cereals or add sprinkles for extra fun.


