
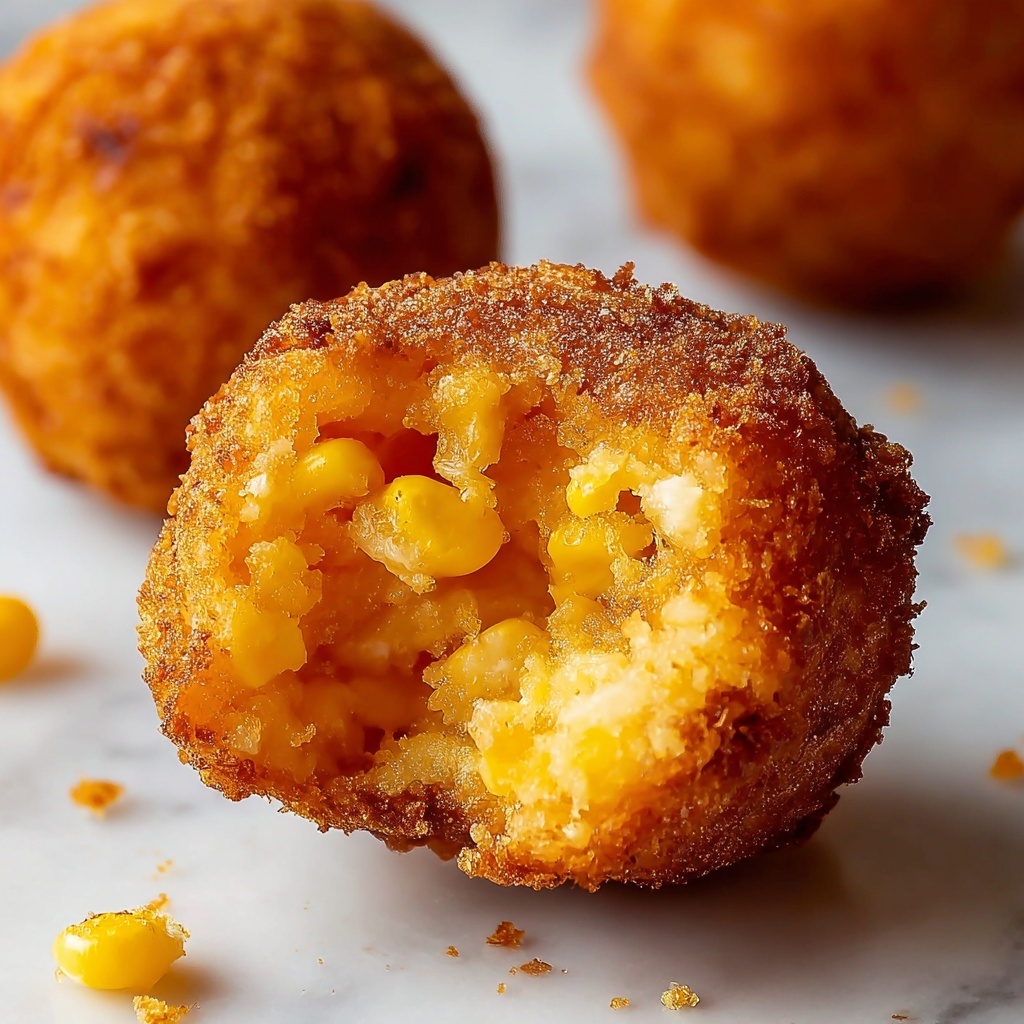
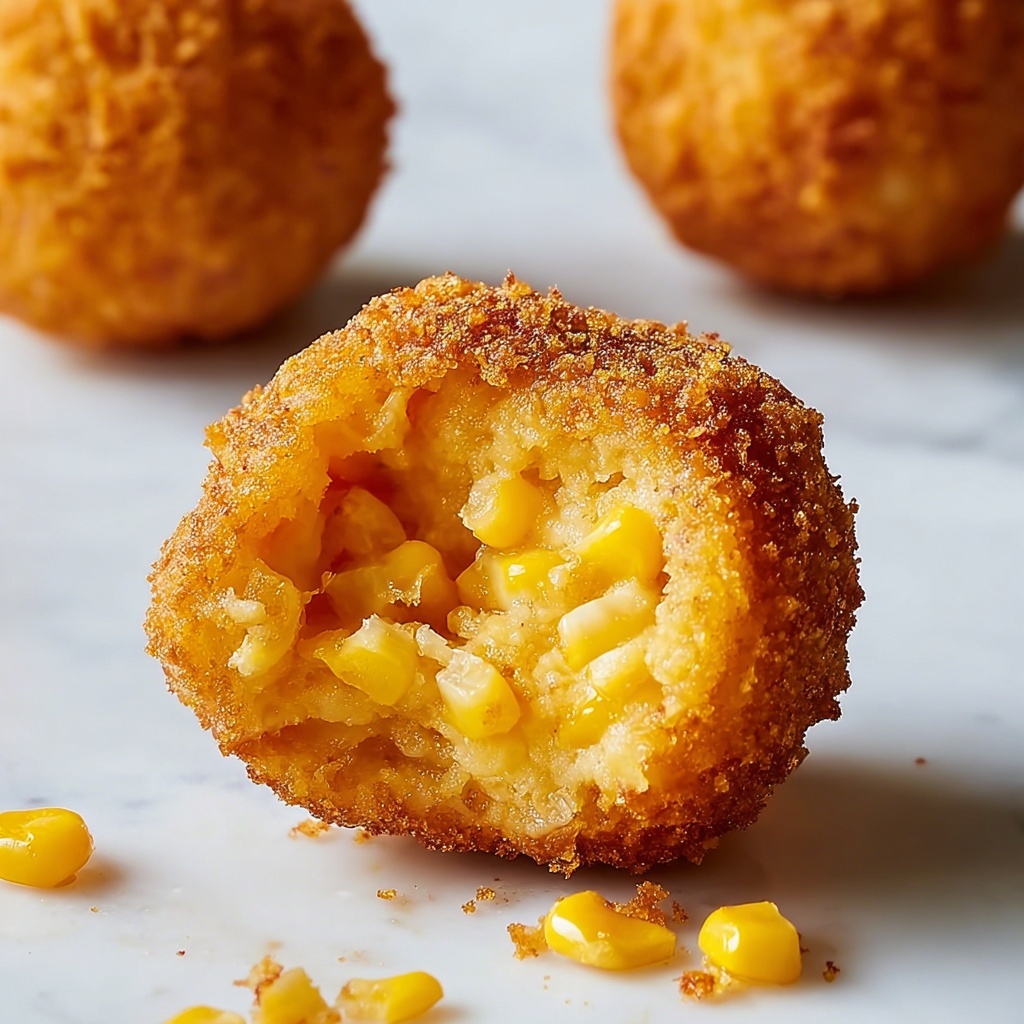
If you’ve ever craved that perfect crunchy snack that’s bursting with sweet corn goodness, then this Crispy Golden Corn Nuggets Recipe is about to become your new favorite treat. Imagine little, bite-sized pillows of golden-fried joy, crispy on the outside and tender on the inside, with juicy bursts of corn in every mouthful. It’s simple, quick, and utterly irresistible—perfect for sharing with friends or enjoying as a delightful snack anytime. Once you get the hang of this recipe, these nuggets will be a staple in your kitchen rotation, delivering comfort and crispiness in every single bite.
Ingredients You’ll Need
The magic of this Crispy Golden Corn Nuggets Recipe lies in its straightforward ingredients that work harmoniously to create the perfect texture and flavor. Each component, from the fluffy flour to the sweet corn kernels, plays a critical role in turning simple pantry staples into a golden masterpiece.
- 1 cup all-purpose flour: This forms the base of your nuggets’ batter, giving them structure and lightness when fried.
- 1 teaspoon baking powder: Adds a gentle lift so the nuggets stay fluffy inside rather than dense.
- 1/2 teaspoon salt: Enhances all the flavors and balances the corn’s natural sweetness.
- 1/2 teaspoon sugar: Just a touch to complement the corn’s sweetness and deepen the golden color.
- 1 large egg: Binds the batter together and adds a rich, smooth texture.
- 1/2 cup milk: Keeps the batter moist, ensuring a tender bite.
- 1 tablespoon shortening, melted: Helps add richness and a luscious mouthfeel to the batter.
- 12 ounces canned corn, drained: The star ingredient, providing bursts of juicy, sweet flavor in every nugget.
- 1–2 cups oil for deep frying: Essential for that crispy, crunchy exterior that’s so satisfying.
How to Make Crispy Golden Corn Nuggets Recipe
Step 1: Heat the oil
First things first, heat your oil in a deep fryer or heavy-bottomed pot until it reaches about 180°C (350°F). Achieving this temperature is key to getting that perfect crunch and beautiful golden color on your corn nuggets. If the oil is too cool, your nuggets will soak up oil and turn greasy rather than crispy.
Step 2: Prepare the dry mixture
In a medium mixing bowl, whisk together the all-purpose flour, baking powder, salt, and sugar. Combining these dry ingredients evenly means every bite will have consistent flavor and lovely, airy texture. The baking powder is your secret to nuggets that puff ever so slightly as they cook.
Step 3: Prepare the wet mixture
In a separate bowl, whisk the egg, milk, and melted shortening until you have a smooth, well-blended mixture. This wet combination will bring moisture and richness to your batter. Slowly add the wet ingredients into the dry mixture, stirring gently to avoid lumps but don’t over-mix—some little lumps are just fine. Then, fold in the drained canned corn, making sure each kernel is beautifully coated.
Step 4: Fry the nuggets
Carefully drop spoonfuls of the corn batter into the hot oil, being mindful not to overcrowd the pot. Fry the nuggets for about 2 to 2 ½ minutes or until they develop that irresistible golden brown hue and crisp shell. Keep an eye on them and give the nuggets a gentle turn to ensure even frying on all sides.
Step 5: Drain and serve
Once perfectly golden and crispy, scoop the nuggets out with a slotted spoon and place them on paper towels to drain excess oil. This step is crucial for maintaining their crispiness and keeping them light. Serve them piping hot for the ultimate crunch and flavor experience that will have you coming back for more.
How to Serve Crispy Golden Corn Nuggets Recipe
Garnishes
Sprinkling your corn nuggets with a pinch of smoked paprika, a dash of freshly ground black pepper, or some chopped fresh herbs like parsley or chives adds an extra layer of flavor and visual appeal. A side of tangy dipping sauce, such as spicy mayo or a honey mustard drizzle, can elevate the snacking experience even further.
Side Dishes
These nuggets pair beautifully with simple sides that complement their crunchy texture and sweet corn flavor. Think fresh garden salads, creamy coleslaw, or even a bowl of tomato soup for dipping. For a heartier meal, they’re fantastic alongside baked beans or a crisp, citrusy cucumber salad.
Creative Ways to Present
Beyond the classic serving plate, try skewering these corn nuggets alongside cherry tomatoes and bell pepper chunks for a playful appetizer. Or stack them up on a platter with an assortment of dips for a party spread that’s sure to impress. You can even stuff them into soft bao buns or mini sliders for a fun twist on finger food.
Make Ahead and Storage
Storing Leftovers
If you have any crispy golden corn nuggets left over—which might be rare—they can be stored in an airtight container in the refrigerator for up to two days. Keep in mind that the nuggets will lose some of their crispiness but will still maintain their delicious flavor.
Freezing
For longer storage, arrange the cooled nuggets in a single layer on a baking sheet and freeze until solid. Then transfer them to a freezer-safe bag or container. Frozen nuggets are best used within one month for optimal taste. When you want your snack fix, you’ll have these ready-made golden nuggets waiting.
Reheating
To revive that crispy exterior, reheat the corn nuggets in a preheated oven at 200°C (400°F) for 5 to 8 minutes or until warm and crisp again. Avoid reheating in a microwave, as this will make them soggy and lose that signature crunch.
FAQs
Can I use fresh corn instead of canned corn?
Absolutely! Fresh corn kernels can add a delightful pop of sweetness and freshness. Just make sure they’re cooked or blanched to soften slightly before folding them into the batter to achieve the same tender texture inside.
Is it possible to bake the corn nuggets instead of frying?
While frying gives the best crispiness and golden color, you can bake the nuggets for a healthier option. Place spoonfuls onto a greased baking sheet and bake at 200°C (400°F) for about 15-20 minutes, flipping halfway through. The texture will be slightly different but still tasty.
What can I use as a dipping sauce with the nuggets?
The world is your oyster here! Classic ranch, spicy sriracha mayo, honey mustard, or even a cool avocado dip all pair beautifully with the savory-sweet flavor of the nuggets. Feel free to experiment with your favorites.
Can I make the batter ahead of time?
It’s best to mix the batter and fry the nuggets fresh, as the texture is lightest that way. However, you could prepare the dry and wet ingredients separately a few hours in advance and combine them just before frying.
How do I know when the oil is hot enough for frying?
If you don’t have a thermometer, drop a small bit of batter into the oil; if it immediately bubbles and rises to the surface, the oil is ready. If it browns too quickly or burns, the oil is too hot. Adjust the heat as needed to maintain that crisp golden fry.
Final Thoughts
There’s something truly special about the simple joy of biting into crispy, golden nuggets of sweet corn, especially when you’ve made them yourself. This Crispy Golden Corn Nuggets Recipe combines ease, flavor, and satisfying crunch in a way that always delights family and friends alike. I encourage you to try it out soon—it’s bound to become a cherished favorite in your snack arsenal, bringing warmth and happiness with every delicious bite.
Print
Crispy Golden Corn Nuggets Recipe
- Prep Time: 10 minutes
- Cook Time: 15 minutes
- Total Time: 25 minutes
- Yield: 30 nuggets
- Category: Appetizer
- Method: Frying
- Cuisine: American
Description
Crispy Golden Corn Nuggets are delightful bite-sized snacks made from a flavorful batter of flour, corn, and basic pantry staples. Deep fried to a perfect golden brown, these nuggets are crispy on the outside and tender inside, making them an irresistible appetizer or party treat.
Ingredients
Dry Ingredients
- 1 cup all-purpose flour
- 1 teaspoon baking powder
- 1/2 teaspoon salt
- 1/2 teaspoon sugar
Wet Ingredients
- 1 large egg
- 1/2 cup milk
- 1 tablespoon shortening, melted
- 12 ounces canned corn, drained
For Frying
- 1–2 cups oil for deep frying
Instructions
- Heat the oil: In a heavy pot or deep fryer, heat the oil to 180°C (350°F). Maintaining this temperature ensures that the corn nuggets fry evenly and achieve a crisp, golden exterior.
- Prepare the dry mixture: In a medium bowl, whisk together all-purpose flour, baking powder, salt, and sugar until thoroughly combined. This dry base provides the structure and lightness for the nuggets.
- Prepare the wet mixture: In a separate bowl, beat the egg, milk, and melted shortening together until smooth. Gradually add this to the dry ingredients, stirring gently until you have a smooth batter with no lumps.
- Incorporate the corn: Carefully fold in the drained canned corn kernels into the batter, ensuring even distribution without overmixing.
- Fry the nuggets: Using a spoon, carefully drop spoonfuls of the batter into the hot oil. Fry in batches for about 2 to 2 1/2 minutes each, turning occasionally, until the nuggets turn golden brown all over.
- Drain and serve: Remove the fried corn nuggets with a slotted spoon and transfer them to a paper towel-lined plate to absorb excess oil. Serve immediately while warm to enjoy their crispy texture.
Notes
- Ensure oil temperature is maintained at 180°C (350°F) for crispy results.
- Do not overcrowd the frying pot to prevent temperature drops.
- Serve with dips like ketchup or spicy mayo for added flavor.
- You can substitute canned corn with fresh or frozen corn, but adjust moisture accordingly.
