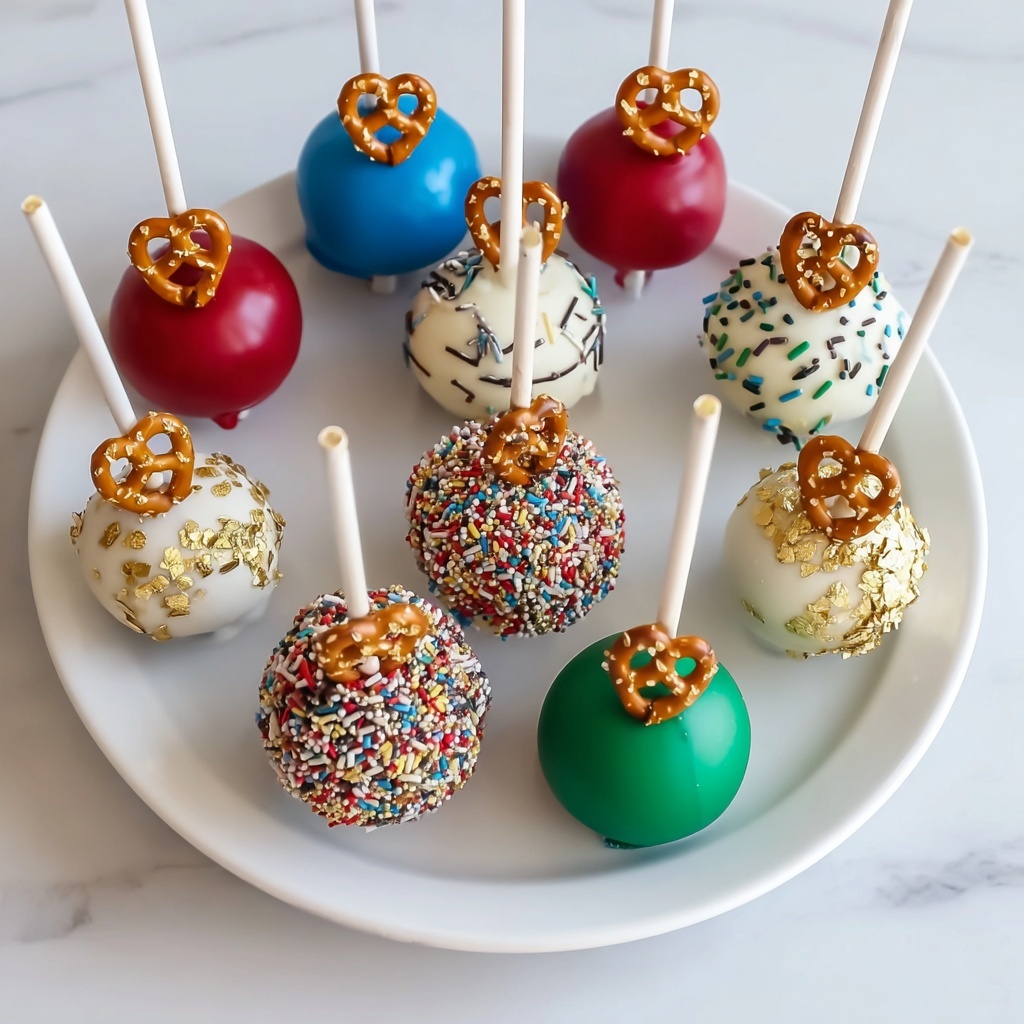
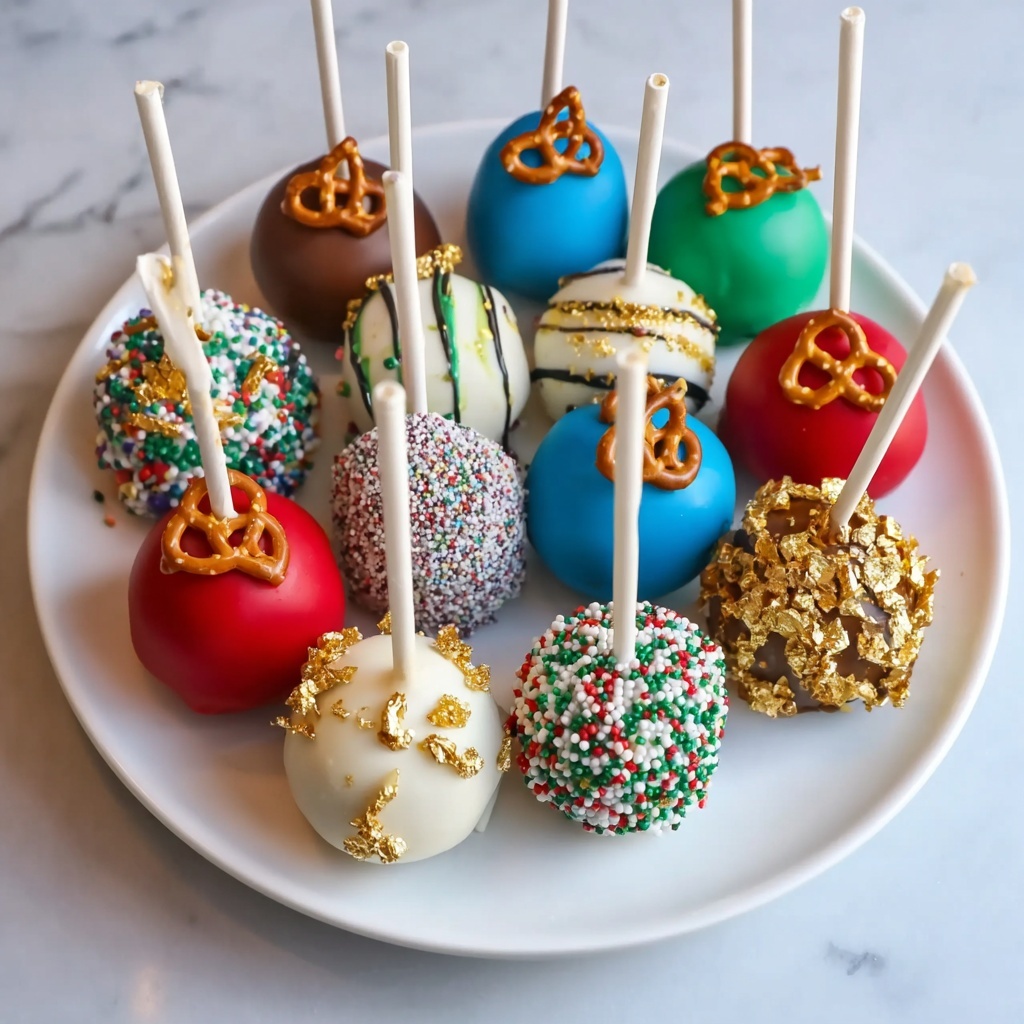
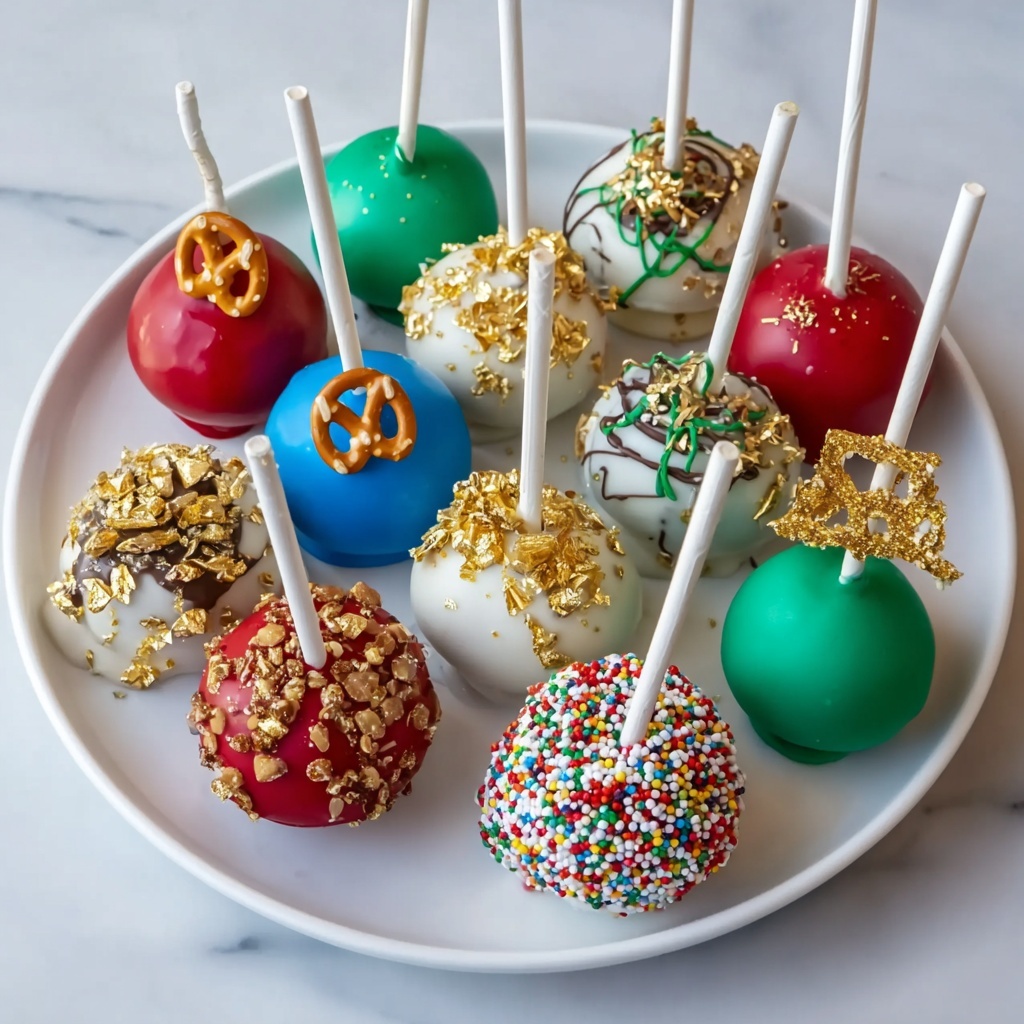
If you are looking to make your holiday parties extra special, the Ornament Ball Cake Pop Display Recipe is your new best friend in the kitchen. This delightful treat transforms classic cake pops into charming, festive ornaments that not only taste heavenly but also add a whimsical decorative touch to any celebration. The combination of moist, flavorful cake, creamy frosting, and colorful candy coatings makes every bite irresistibly fun and festive. Whether you are a seasoned baker or a curious beginner, this recipe guides you through a simple but impressive dessert that will impress friends and family alike.
Ingredients You’ll Need
The beauty of the Ornament Ball Cake Pop Display Recipe lies in its simplicity and the way each ingredient plays a crucial role in perfecting the taste and presentation. From the base of tender cake crumbs to the glossy coatings that bring these festive orbs to life, each component is essential in crafting this magical treat.
- 1 box (14 oz) vanilla or chocolate cake mix with required ingredients: This provides the fluffy, flavorful foundation for your cake pops.
- 1/2 cup cream cheese frosting or vanilla buttercream: Acts as the perfect binder and adds creamy richness.
- 17.6 oz white chocolate or candy melts, assorted colors: These create the smooth, colorful coating that makes your cake pops look like real ornaments.
- 2 tbsp vegetable shortening (optional): Helps to smooth out the coating for easier dipping and a glossy finish.
- Assorted sprinkles, edible glitter, and small candies: Adds festive flair and texture to decorate your cake pops creatively.
- 24 mini pretzel loops or candy-coated chocolate pieces: Perfect for creating the ornament tops, making your display more authentic.
- Edible gold or silver luster dust (optional): Gives a shimmering holiday sparkle to your finished pops.
How to Make Ornament Ball Cake Pop Display Recipe
Step 1: Bake Your Cake
Start by preparing the cake mix according to the package instructions, baking it until perfectly done. Once baked, allow the cake layers to cool completely. This step is crucial because warm cake crumbs will not bind well with frosting.
Step 2: Crumble the Cake
Using your hands or a fork, crumble the cooled cake into fine crumbs in a large mixing bowl. The finer the crumbs, the smoother your cake balls will be, creating that perfect bite every time.
Step 3: Combine Frosting with Cake Crumbs
Gradually mix in the cream cheese frosting or buttercream, starting with a small amount and working your way up. Your goal is to achieve a mixture that holds together without being too sticky or dry enough to crumble apart.
Step 4: Form the Cake Balls
Using a tablespoon or small cookie scoop, portion out equal amounts of the cake-frosting mixture and roll each into a smooth, round ball. Place these on a parchment-lined tray for easy handling.
Step 5: Chill the Cake Balls
Refrigerate the formed cake balls for at least 30 minutes. This chilling step firms them up, making them much easier to dip without falling apart.
Step 6: Melt the Coating
Gently melt your white chocolate or candy melts in a microwave-safe bowl, stirring occasionally for even melting. If desired, stir in vegetable shortening to thin the coating, ensuring a shiny, smooth finish on your pops.
Step 7: Insert the Sticks
Dip one end of each lollipop stick into the melted coating, then carefully insert it halfway into each chilled cake ball. This helps secure the stick firmly. After inserting all sticks, return the cake balls to the fridge for another 10 minutes to set.
Step 8: Coat the Cake Pops
Now for the fun part! Dip each cake pop completely into the melted coating. Gently tap off any excess coating to avoid drips and uneven surfaces. Smooth, even coats will ensure your cake pops look professional and inviting.
Step 9: Dress Up Your Ornament Pops
Before the coating sets, sprinkle your cake pops with festive decorations like sprinkles, edible glitter, or small candies to mimic holiday ornaments. Attach the mini pretzel loops or candy pieces at the top to create the perfect ornament “hook.”
Step 10: Set Upright and Add Finishing Touches
Stand your cake pops upright in foam blocks or a dedicated cake pop stand. Allow them to harden completely. For an extra magical effect, lightly dust with edible gold or silver luster dust, giving your ornament display a sparkling holiday glow.
How to Serve Ornament Ball Cake Pop Display Recipe
Garnishes
When serving, think beyond simple sprinkles. Edible glitter or a dusting of powdered sugar can elevate the look, making your cake pops gleam like festive decorations. Adding tiny edible pearls or silver dragées enhances the ornament theme beautifully.
Side Dishes
Pair these cake pops with light and refreshing sides like a citrus salad or minty tea to balance their sweetness. They also complement holiday cookie platters, creating a vibrant dessert table that appeals to all ages.
Creative Ways to Present
Display your ornament cake pops on a festive foam stand shaped like a Christmas tree or arrange them in a decorative vase filled with colored sand or beads to keep them steady. You can also tie small ribbons around each stick for an extra touch of charm.
Make Ahead and Storage
Storing Leftovers
Leftover cake pops can be stored in an airtight container in the refrigerator for up to five days. Make sure they’re kept upright if possible to avoid smudging the beautiful coatings and decorations.
Freezing
You can freeze cake pops for longer storage by placing them in a single layer on a baking sheet until solid, then transferring them to an airtight container or freezer bag. They will keep well for up to two months.
Reheating
Let frozen cake pops thaw in the fridge overnight before serving. Avoid microwaving, as this can ruin the texture and cause the coatings to melt unevenly. Enjoy them chilled or at room temperature for best flavor.
FAQs
Can I use homemade cake instead of a box mix for this Ornament Ball Cake Pop Display Recipe?
Absolutely! Homemade cake works wonderfully and allows you to customize flavors even more. Just make sure the cake is fully cooled and crumbly enough to mix well with frosting.
What can I substitute for cream cheese frosting?
You can use vanilla buttercream or any sturdy frosting that binds the cake crumbs together. Cream cheese frosting adds tanginess, but buttercream provides a sweeter, smooth finish.
How do I prevent the cake pops from falling off the sticks?
Dipping the stick tips in melted coating before inserting into the cake balls helps secure them. Chilling the cake balls before and after inserting sticks is also key to keeping them firmly in place.
Can I make cake pops without lollipop sticks?
While sticks make them easier to handle and display, you can also serve cake balls without sticks on a platter, though they won’t have the “ornament” presentation that makes this recipe so special.
How do I get that shiny finish on the coating?
Adding vegetable shortening to the melted candy melts or chocolate helps thin the coating and creates a glossy, professional-looking finish. Properly melting and stirring also ensures smooth coverage.
Final Thoughts
Making the Ornament Ball Cake Pop Display Recipe is such a joyful and rewarding experience—perfect for creating sweet memories during the holidays or anytime you want to sprinkle a little extra fun into your celebrations. The combination of festive presentation and delicious flavor makes these cake pops a standout treat that everyone will be buzzing about. Give this recipe a try, and watch as your dessert table transforms into a dazzling display of edible ornaments that taste as delightful as they look!
Print
Ornament Ball Cake Pop Display Recipe
- Prep Time: 30 minutes
- Cook Time: 35 minutes
- Total Time: 1 hour 15 minutes
- Yield: 24 servings
- Category: Dessert
- Method: Baking
- Cuisine: American
Description
Create festive Ornament Ball Cake Pops that look just like holiday ornaments. This fun dessert features moist cake balls coated in colorful white chocolate or candy melts, decorated with sprinkles and edible glitter, and topped with mini pretzel loops to mimic ornament hooks. Perfect for holiday parties and gift-giving!
Ingredients
Cake and Frosting
- 1 box (14 oz) vanilla or chocolate cake mix with required ingredients as per package
- 1/2 cup cream cheese frosting or vanilla buttercream
Coating and Decorations
- 17.6 oz white chocolate or candy melts, assorted colors
- 2 tbsp vegetable shortening (optional, for smoother coating)
- Assorted sprinkles, edible glitter, and small candies
- 24 mini pretzel loops or candy-coated chocolate pieces (for ornament tops)
- Edible gold or silver luster dust (optional)
Instructions
- Bake Cake: Prepare and bake the cake according to the package instructions. Once baked, allow the cake to cool completely to room temperature.
- Crumble Cake: Break the cooled cake into fine crumbs in a large mixing bowl, ensuring there are no large chunks.
- Combine Frosting: Gradually add the cream cheese frosting or vanilla buttercream to the cake crumbs. Mix thoroughly until the mixture holds together and can be shaped easily into balls.
- Form Cake Balls: Scoop tablespoon-sized portions of the mixture and roll each into a smooth ball. Place the formed balls on a parchment-lined tray.
- Chill Cake Balls: Refrigerate the cake balls for at least 30 minutes so they firm up and become easier to work with.
- Melt Coating: Melt the white chocolate or candy melts in a microwave-safe bowl, stirring every 30 seconds until smooth. Optionally stir in vegetable shortening to achieve a thinner, smoother coating.
- Insert Sticks: Dip one end of each lollipop stick into the melted coating, then insert the stick halfway into each cake ball. Repeat for all balls and refrigerate for 10 minutes to set the sticks firmly in place.
- Coat Cake Pops: Dip each cake pop fully into the melted coating, gently tapping off any excess chocolate to get a smooth finish.
- Decorate: While the coating is still wet, decorate each cake pop with sprinkles, edible glitter, or small candies to resemble festive holiday ornaments. Attach a mini pretzel loop or candy piece at the top to imitate an ornament hook.
- Set Upright: Stand the decorated cake pops upright in a foam block or cake pop stand to allow the coating to harden completely without smudging.
- Add Luster: Optionally, dust the cake pops lightly with edible gold or silver luster dust to give them a shimmering, elegant finish.
Notes
- Ensure the cake is completely cooled before crumbling to prevent the frosting from melting prematurely.
- Vegetable shortening is optional but helps thin the chocolate for a smoother dip and finish.
- If mini pretzel loops are not available, candy-coated chocolates can be used as ornament hooks.
- Store finished cake pops in an airtight container in the refrigerator for up to 3 days.
- You can customize the colors and decorations to match any holiday or party theme.

