There is something utterly magical about turning simple Oreo cookies into a whimsical winter treat, and that’s exactly what the Oreo Snowman Cake Pops Recipe delivers. These charming little snowmen are not only adorable but also bursting with the perfect mix of creamy, crunchy, and sweet flavors. Whether you’re preparing for a festive party or simply craving a fun dessert project, these cake pops combine ease and delight in every bite. The vibrant decorations make them a cheerful centerpiece, guaranteed to impress kids and adults alike with their playful charm and irresistible taste.
Ingredients You’ll Need
Gathering the ingredients for this recipe is a breeze, and each one plays a crucial role in creating the perfect Oreo Snowman Cake Pops. From the rich creaminess of cream cheese to the smooth coating of white chocolate, every element contributes to a beautifully balanced and festive treat.
- 36 Oreo cookies: The core ingredient providing that iconic chocolate cookie flavor and crunchy texture after crushing.
- 6 oz cream cheese, softened: This binds the crushed Oreos into a creamy, smooth dough that’s easy to shape.
- 12 oz white chocolate or candy melts: Used to coat and seal the snowman cake pops with a sweet, snowy finish.
- Mini chocolate chips or black decorating gel: Perfect for crafting the snowmen’s expressive eyes and cute buttons.
- Orange sprinkles or colored icing: Adds a pop of color for the classic carrot nose.
- Pretzel sticks or colored fondant: Ideal for creating charming snowman arms and scarves that add personality.
- Lollipop sticks: Essential for holding and presenting these delightful cake pops with ease.
How to Make Oreo Snowman Cake Pops Recipe
Step 1: Crush the Oreos
Start by pulsing the Oreo cookies in a food processor until they’re finely crushed. This step is crucial because you want a consistent crumb texture that will blend seamlessly with the cream cheese to form your dough.
Step 2: Form the Dough
Transfer the crushed Oreos into a mixing bowl and mix them with the softened cream cheese. Take your time here to achieve a smooth, uniform dough without any lumps. This mixture is the foundation for your cake pops, so a velvety texture is key.
Step 3: Shape the Balls
Roll the dough into 32 smaller balls around ¾ inch in diameter for the snowmen’s heads, and 16 larger balls about 1¼ inch for the bodies. Uniform sizing helps your final product look polished and balanced.
Step 4: Assemble the Snowmen
Gently stack one small ball on top of one large ball for each snowman, pressing just enough to make them stick. Then, insert a lollipop stick through both balls to secure the snowman together. Place them carefully on a parchment-lined tray.
Step 5: Chill the Snowmen
Pop the assembled snowmen into the freezer for 20 to 30 minutes until they are firm. This chilling step is vital so they hold their shape during coating.
Step 6: Melt the Coating
While the snowmen chill, melt the white chocolate or candy melts in a microwave-safe bowl. Stir the mixture frequently to get a smooth, silky texture that will coat each pop beautifully.
Step 7: Coat the Snowmen
Dip each chilled snowman into the melted white chocolate, turning to cover every inch. Allow any excess coating to drip off, then stand each pop upright in a styrofoam block or a cup so it can set properly without losing shape.
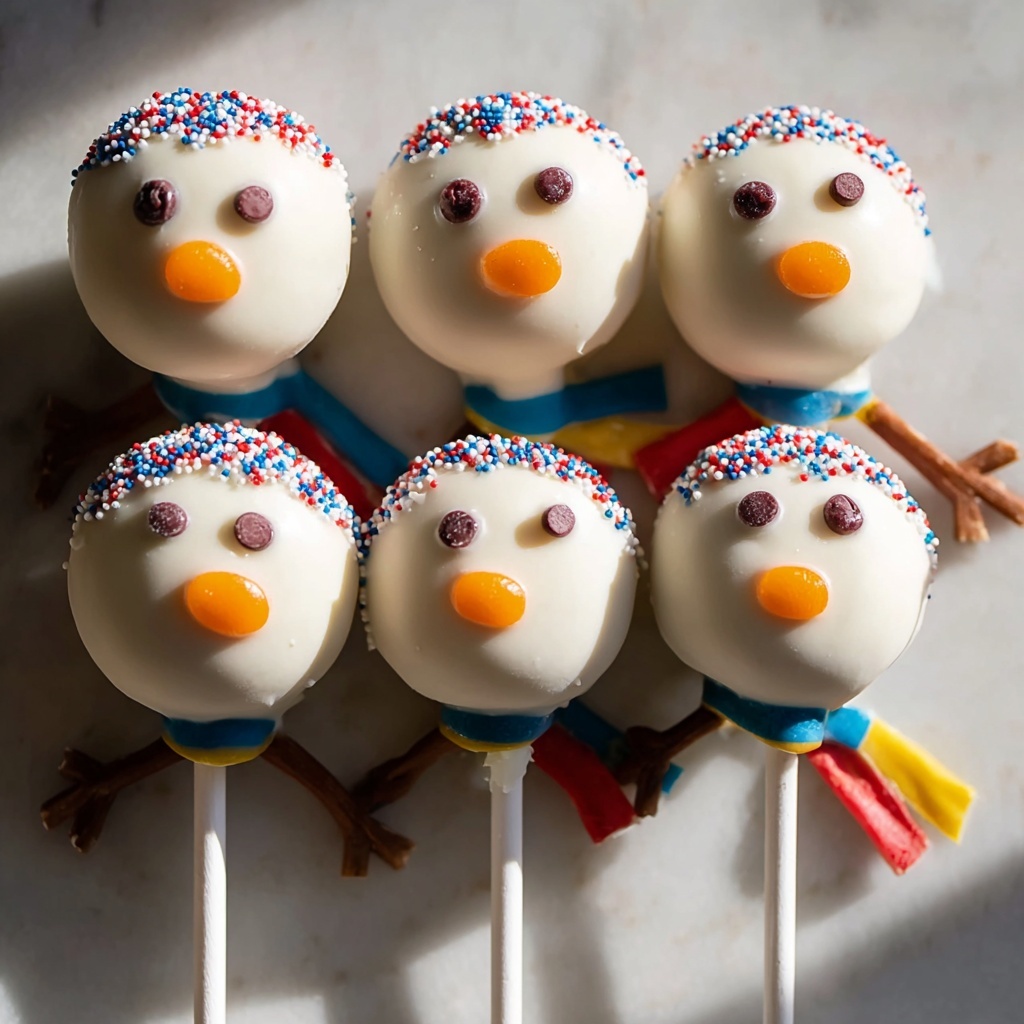
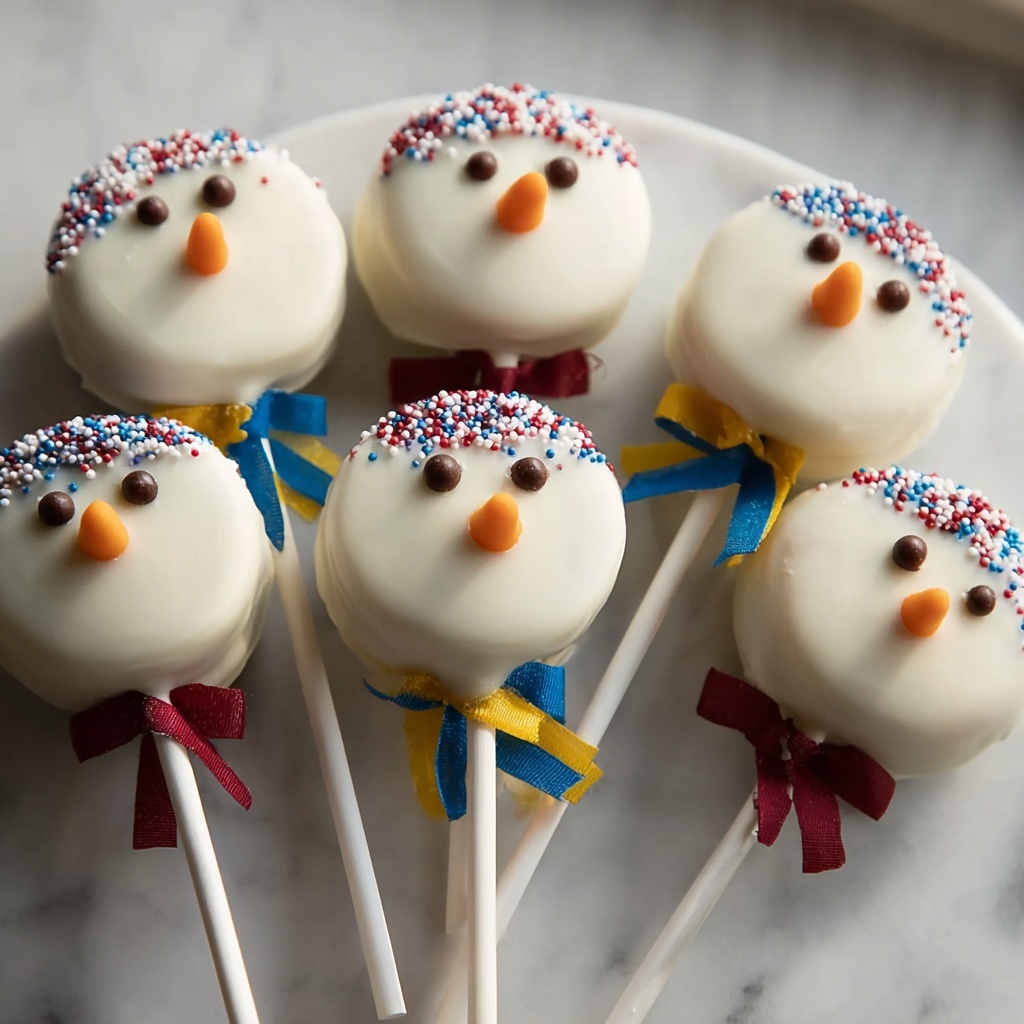
Step 8: Decorate the Details
While the white chocolate is still tacky, quickly add mini chocolate chips or use black decorating gel to create the eyes and buttons. Use orange icing or sprinkles to form the adorable carrot noses and bring your snowmen to life.
Step 9: Add Final Decorations
After the coating has completely set, attach pretzel sticks as arms and add colorful fondant scarves if you like. These final touches add personality and charm, making your snowmen extra festive and fun.
How to Serve Oreo Snowman Cake Pops Recipe

Garnishes
Think playful and colorful. Sprinkling extra edible glitter, adding tiny fondant hats, or dusting with powdered sugar can elevate the presentation. These little details turn your Oreo Snowman Cake Pops into eye-catching treats on any dessert table.
Side Dishes
These cake pops pair wonderfully with light accompaniments like spiced hot cocoa or a cup of creamy eggnog. Fresh fruit platters or simple vanilla bean ice cream also complement the sweet richness, creating a full festive spread.
Creative Ways to Present
Use a styrofoam block covered in festive fabric or a decorative vase filled with colored sugar crystals to display your cake pops upright. You can also group them in small bouquet arrangements for a charming, giftable touch that’s perfect for holiday parties.
Make Ahead and Storage
Storing Leftovers
If you have any of these delightful Oreo Snowman Cake Pops left over, store them in an airtight container at room temperature for up to three days. Keeping them covered prevents the white chocolate coating from absorbing moisture or odors.
Freezing
For longer storage, carefully wrap each cake pop individually in plastic wrap and place them in a freezer-safe container. They freeze well for up to a month. When you’re ready to enjoy, simply thaw them at room temperature.
Reheating
These cake pops are best enjoyed chilled or at room temperature, so reheating is not necessary. If the coating feels too firm after refrigeration, leave them out for 10-15 minutes to soften slightly before serving.
FAQs
Can I use a different cookie instead of Oreos?
Absolutely! While Oreos give the cake pops their classic flavor and color contrast, you can experiment with other sandwich cookies. Just pick ones with a sturdy texture and a cream filling for best results.
What if I don’t have a food processor?
No worries. You can place the Oreo cookies in a sealed plastic bag and crush them with a rolling pin until finely ground. It might take a bit more elbow grease, but the results are just as delicious.
Can I make these dairy-free?
Yes! Substitute the cream cheese for a dairy-free cream cheese alternative and use dairy-free white chocolate or candy melts. The texture might vary slightly, but the cake pops will still be tasty and fun.
How can I make the decorations more stable?
To help the decorations stick well, apply them while the chocolate coating is still a bit soft but not too wet. For pretzel arms or fondant scarves, you can use a dab of melted chocolate as edible glue.
Is it okay to skip the chilling step?
Chilling is highly recommended as it helps the cake pops firm up before dipping. Skipping it might cause them to fall apart or lose shape when coated. If time is tight, freeze them for at least 15 minutes at minimum.
Final Thoughts
There’s something truly joyful about making and sharing the Oreo Snowman Cake Pops Recipe. It’s a sweet, fun project that brings laughter and smiles to any gathering or quiet afternoon treat. With simple ingredients and easy steps, anyone can create these charming little snowmen that brighten the season with every bite. Give them a try — your taste buds and your guests will thank you!
Print
Oreo Snowman Cake Pops Recipe
- Prep Time: 15 minutes
- Cook Time: 20 minutes (freezing and setting time included)
- Total Time: 35 minutes
- Yield: 16 snowman cake pops
- Category: Dessert
- Method: No-Cook
- Cuisine: American
Description
These adorable Oreo Snowman Cake Pops are a festive and delicious treat perfect for holiday celebrations. Made with crushed Oreos and cream cheese, dipped in creamy white chocolate, and decorated with fun details like chocolate chip eyes, orange noses, and pretzel arms, they’re sure to delight kids and adults alike. Easy to make and no baking required, these cake pops are a fun way to bring winter magic to your dessert table.
Ingredients
Oreo Cake Pop Base
- 36 Oreo cookies (1 standard package)
- 6 oz cream cheese, softened
Coating and Decoration
- 12 oz white chocolate or candy melts
- Mini chocolate chips or black decorating gel (for eyes and buttons)
- Orange sprinkles or colored icing (for nose)
- Pretzel sticks or colored fondant (for arms and scarves)
- Lollipop sticks
Instructions
- Crush Oreos: Place the Oreo cookies into a food processor and pulse until they are finely crushed into a powder-like consistency.
- Form Dough: Transfer the crushed Oreos to a bowl and mix in the softened cream cheese until the mixture is smooth, uniform, and able to hold its shape.
- Shape Balls: Roll the Oreo and cream cheese mixture into 32 small balls about ¾ inch in diameter, and 16 larger balls about 1¼ inch in diameter.
- Assemble Snowmen: Stack one small ball atop one large ball for each snowman, pressing gently to adhere the pieces together. Insert a lollipop stick through the center of each stack and place them upright on a parchment-lined baking sheet.
- Chill Snowmen: Place the assembled snowmen in the freezer for 20 to 30 minutes to firm up and prepare for coating.
- Melt Coating: In a microwave-safe bowl, melt the white chocolate or candy melts in short bursts, stirring until completely smooth and fluid.
- Coat Snowmen: Dip each chilled snowman carefully into the melted chocolate, turning to coat fully. Allow any excess coating to drip off, then stand the coated snowmen upright in a styrofoam block or cup to set.
- Decorate Details: While the chocolate coating is still tacky, decorate the snowmen by adding mini chocolate chips or using black decorating gel for the eyes and buttons. Use orange sprinkles or colored icing to fashion the nose.
- Add Final Decorations: After the coating has fully set, attach pretzel sticks on the sides as arms and add colored fondant or other decorations for scarves to finish your snowmen.
Notes
- The Oreo and cream cheese mixture should be cold enough to hold a shape but soft enough to roll. Chill it if necessary.
- Use a styrofoam block or an empty cup to hold the cake pops upright while the coating sets.
- If white chocolate is too thick, add a small amount of vegetable oil or shortening to thin it out for easier dipping.
- Store cake pops in an airtight container in the refrigerator for up to 5 days.
- For a festive twist, try adding food coloring to the white chocolate or use different decorations to customize your snowmen.


