
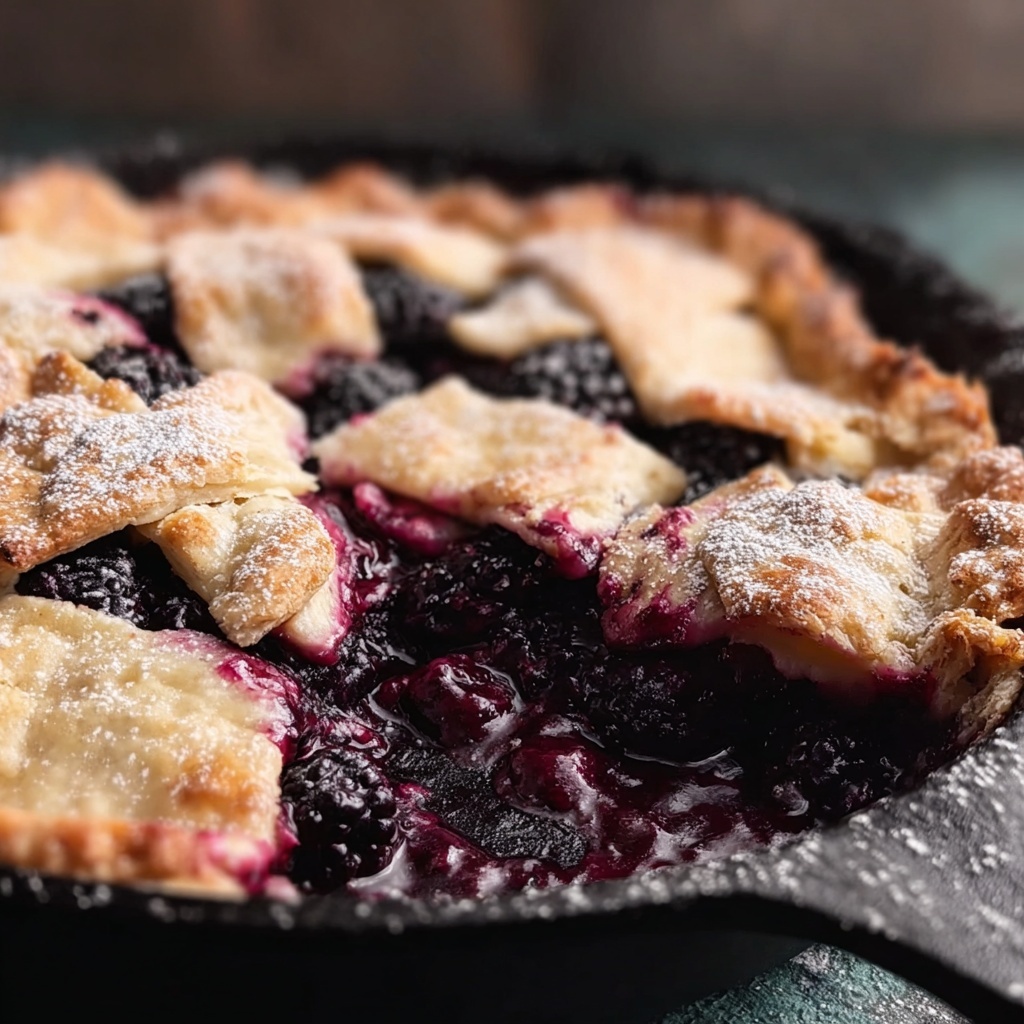
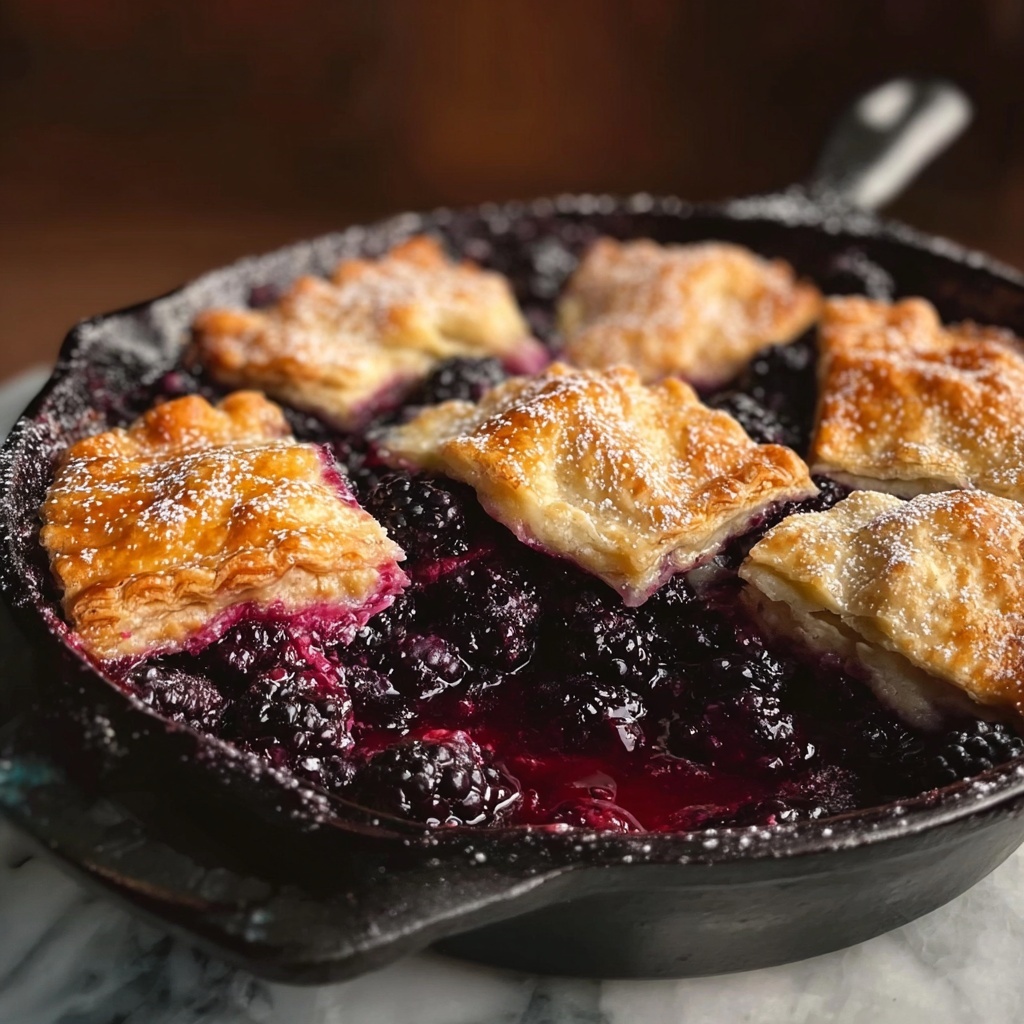
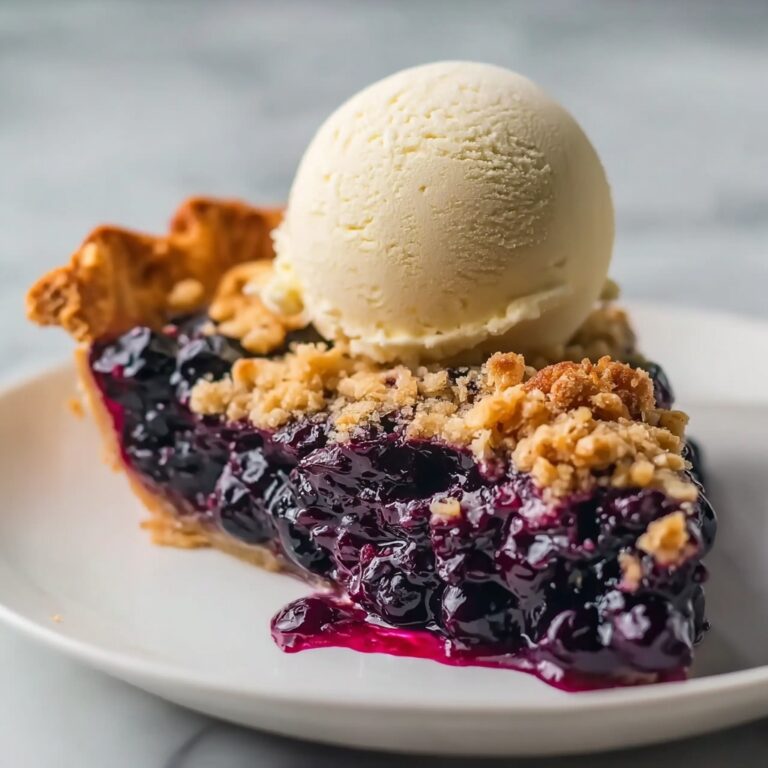
There is nothing quite as comforting and mouthwatering as a warm, fruity cobbler fresh from the oven, and this Easy Skillet Blackberry Cobbler Recipe offers just that with minimal fuss. Imagine juicy blackberries enveloped in a buttery, flaky crust baked right in your trusty cast iron skillet, combining a perfect balance of sweet and tart flavors. This dish not only brings cozy vibes to your table but is also incredibly simple to make, using pantry staples and frozen berries for convenience. Whether you’re serving it for a family dessert or impressing guests at a casual get-together, this skillet cobbler will quickly become a beloved classic in your recipe collection.
Ingredients You’ll Need
Getting started with this Easy Skillet Blackberry Cobbler Recipe is a breeze because it calls for straightforward ingredients, each chosen to ensure the perfect mix of texture, flavor, and color. Every component plays a role, from the tender pie crust that forms the buttery base and top, to the juicy blackberries sweetened just right to create that luscious filling.
- Refrigerated pie crusts: Using two pre-made crusts saves time and guarantees a flaky, golden crust with minimal effort.
- Frozen blackberries: These provide the delicious fruity center and hold up well during baking, offering bold flavor and vibrant color.
- Butter, melted and cubed: Melted butter blends with sugar and flour to coat the berries, while cubed butter dotted on top adds richness to the crust’s surface.
- Sugar: Two amounts are used—one to sweeten and balance the tart berries, and another to add a delightful crunch and sparkle to the crust.
- Flour: Helps thicken the blackberry juices into a perfectly luscious filling without being runny.
- Water: Sprinkled over the berries to keep the filling juicy and help ingredients meld together during baking.
How to Make Easy Skillet Blackberry Cobbler Recipe
Step 1: Prepare the Crust Base
Start by preheating your oven to 350°F (175°C). Unroll one pie crust carefully and press it into your 12-inch cast iron skillet, pushing it gently up the sides for a nice even base. Use a fork to pierce the crust in multiple places—this helps avoid bubbling during the initial bake. Pop this crust into the oven and bake it for just 7 minutes to set the base.
Step 2: Mix the Blackberry Filling
While your base crust bakes, boost the oven temperature to 400°F (200°C). In a large mixing bowl, combine the melted butter, 1⅓ cups sugar, and flour, stirring until the mix becomes crumbly. Add the frozen blackberries and toss them gently, ensuring every berry is coated with this delicious crumble mixture.
Step 3: Assemble the Cobbler
Pour the blackberry filling into the skillet over the par-baked crust and then sprinkle the water evenly atop the berries to keep everything beautifully moist. Now unroll the second pie crust to cover the fruit layer and seal the edges by pressing them against the skillet rim. Dot the surface with small cubes of butter to create golden, flavorful spots on the crust.
Step 4: Final Touches and Baking
Sprinkle ¾ cup of sugar evenly all over the top crust for a sweet, crunchy finish. Use a sharp knife to cut several small slits in the crust—these act as vents, allowing steam to escape and preventing sogginess. To protect your crust’s edges from burning, you can wrap foil or a pie shield around the sides before baking. Place the skillet in the oven and bake for about 45 minutes, until you see bubbly edges and a perfectly golden brown crust.
How to Serve Easy Skillet Blackberry Cobbler Recipe
Garnishes
A scoop of vanilla ice cream or a dollop of freshly whipped cream can elevate this cobbler to ultra-special status with their cool creaminess against the warm, fruity filling. For extra flair, sprinkle some toasted almonds or a dusting of cinnamon on top, adding texture and a burst of warm spice with every bite.
Side Dishes
This cobbler pairs wonderfully with a light dessert wine like Moscato or a cup of freshly brewed coffee to balance its sweetness. If you’re serving it as part of a larger meal, simple sides like fresh green salad or roasted vegetables work well, keeping the focus on the rich, comforting dessert.
Creative Ways to Present
For a fun twist, try serving the cobbler straight from the cast iron skillet at the table. It makes the presentation charmingly rustic and keeps the dessert warm longer. Alternatively, scoop portions into charming ramekins or mason jars for individual servings that add a personalized touch to any gathering.
Make Ahead and Storage
Storing Leftovers
Once cooled, cover your leftover cobbler tightly with plastic wrap or transfer it into an airtight container. Store it in the refrigerator, where it will keep fresh and delicious for up to four days. This makes it an easy dessert to enjoy over multiple meals without losing any of the flavor or texture.
Freezing
If you want to save this sweet treat for later, cobbler freezes beautifully. Wrap the whole skillet, or individual servings, tightly in aluminum foil or freezer-safe containers. Frozen cobbler will maintain its quality for up to three months—perfect for a ready-made dessert anytime.
Reheating
To enjoy your cobbler warm again, reheat it in a preheated oven at 350°F (175°C) for about 15 to 20 minutes until bubbly and warmed through. Avoid the microwave if possible, as that can cause the crust to turn soggy instead of flaky and crisp.
FAQs
Can I use fresh blackberries instead of frozen?
Absolutely! Fresh blackberries can be used in this recipe, but because they release more liquid, you may want to slightly reduce the water added to avoid a too-runny filling. Fresh berries will give a bright, natural flavor that’s just as delightful.
What type of skillet is best for this recipe?
A 12-inch cast iron skillet is ideal because it distributes heat evenly and holds the cobbler’s warmth well. However, if you don’t have cast iron, a heavy-duty oven-safe skillet or pie dish can work too, just keep an eye on the baking time.
Can I substitute the refrigerated pie crust with homemade crust?
Yes! If you prefer making your own dough, go for a buttery, flaky pie crust recipe. Just be sure it’s rolled to fit your skillet size and that it bakes thoroughly to achieve the same delicious texture that complements the blackberry filling.
Is the sugar amount adjustable for less sweetness?
Definitely. The sugar levels in this Easy Skillet Blackberry Cobbler Recipe can be tailored to your taste. If you prefer a less sweet dessert, you can reduce the sugar in both the filling and crust topping, but keep in mind the tartness of the blackberries will become more pronounced.
How do I prevent the crust edges from burning?
Using a pie shield or wrapping the edges of the crust in foil halfway through baking is a simple trick to prevent burning. This protects those thinner crust areas from over-browning while allowing the center to cook perfectly and the filling to bubble up deliciously.
Final Thoughts
If you’re searching for a dessert that’s as effortless as it is impressive, this Easy Skillet Blackberry Cobbler Recipe is your new go-to. It combines simplicity, comfort, and irresistible flavor in one cozy skillet. Once you try it, you’ll understand why it’s such a cherished recipe—perfect for any occasion or just because you deserve a sweet treat. Grab your skillet, gather those ingredients, and get ready to enjoy some truly heartwarming comfort food!
Print
Easy Skillet Blackberry Cobbler Recipe
- Prep Time: 15 minutes
- Cook Time: 52 minutes
- Total Time: 1 hour 7 minutes
- Yield: 8 servings
- Category: Dessert
- Method: Baking
- Cuisine: American
Description
This Easy Skillet Blackberry Cobbler is a delightful and simple dessert featuring a buttery pie crust filled with juicy blackberries coated in a sweet, crumbly mixture. Baked in a cast iron skillet, this cobbler develops a golden, crispy crust and bubbling berry filling that’s perfect for any occasion.
Ingredients
Crust
- 1 box of 2 refrigerated pie crusts (Pillsbury recommended)
- ¾ cup sugar (for crust)
- ½ stick butter, cut into small cubes
- ½ cup water
Filling
- 2 (14-16 oz) bags frozen blackberries
- 1 stick butter, melted
- 1⅓ cups sugar (for berries)
- ½ cup flour
Instructions
- Preheat Oven: Preheat your oven to 350°F (175°C) to prepare for baking the crust.
- Prepare Bottom Crust: Unroll one pie crust and fit it into a 12-inch cast iron skillet, pressing it up the sides to form the base.
- Dock Crust: Pierce the crust all over with a fork to prevent bubbling during baking.
- Blind Bake Crust: Bake the crust for 7 minutes in the preheated oven to set it, then remove from the oven.
- Increase Oven Temperature: Raise the oven temperature to 400°F (200°C) to bake the assembled cobbler.
- Prepare Berry Mixture: In a large bowl, mix melted butter, 1⅓ cups sugar, and flour until the mixture becomes crumbly. This acts as a coating and thickener for the berries.
- Coat Blackberries: Add the frozen blackberries to the bowl and toss gently, ensuring they are evenly coated with the buttery sugar-flour mixture.
- Assemble Filling: Pour the berry mixture into the prepared skillet crust and sprinkle the ½ cup water evenly over the berries to help create steam and moisture during baking.
- Cover with Top Crust: Unroll the second pie crust and carefully cover the berries, sealing the edges by pressing down around the skillet rim.
- Add Butter Cubes: Dot the top crust with the small cubes of butter to enhance flavor and browning.
- Sprinkle Sugar: Evenly sprinkle ¾ cup sugar over the top crust for added sweetness and a crunchy topping.
- Vent Top Crust: Cut small slits in the top crust to allow steam to escape during baking, preventing sogginess.
- Bake Cobbler: Bake for about 45 minutes, or until the edges are bubbly and the crust is golden brown, indicating it’s fully cooked.
- Optional Protection: Use a pie shield or aluminum foil around the edges of the crust if you want to prevent burning during the baking process.
Notes
- Using frozen blackberries is convenient and ensures the berries maintain their shape during baking.
- The water sprinkled over the berries helps keep the filling juicy and prevents it from drying out.
- Dotting the top crust with butter adds richness and aids in achieving a golden, crisp finish.
- Using a cast iron skillet helps conduct heat evenly for a beautifully baked cobbler.
- Allow the cobbler to cool slightly before serving to let the filling set for easier slicing.
