
If you’ve ever dreamed of decorating cookies or cakes with a smooth, glossy finish that’s entirely plant-based, then this Vegan Royal Icing Recipe is your new best friend. It’s incredibly simple, remarkably versatile, and made using aquafaba, that magical chickpea water that whips up just like egg whites. Whether you’re outlining festive cookies or flooding them with vibrant colors, this icing provides a stunning, allergen-friendly alternative to traditional royal icing that’ll impress friends and family alike.
Ingredients You’ll Need
Don’t be intimidated by fancy ingredients—this Vegan Royal Icing Recipe relies on just a handful of simple, pantry-friendly staples that work harmoniously to create the perfect texture and taste. Each item plays a crucial role, whether it’s adding sweetness, binding everything together, or giving the icing that classic glossy sheen.
- Aquafaba (60 g): This liquid from cooked chickpeas is the secret to creating fluffy, egg-free royal icing—it whips up just like egg whites!
- Powdered sugar (400 g): Provides sweetness and structure; use organic if available for the best purity.
- Lemon juice (1 tablespoon): Adds a subtle tang that balances the sweetness and helps with the drying process.
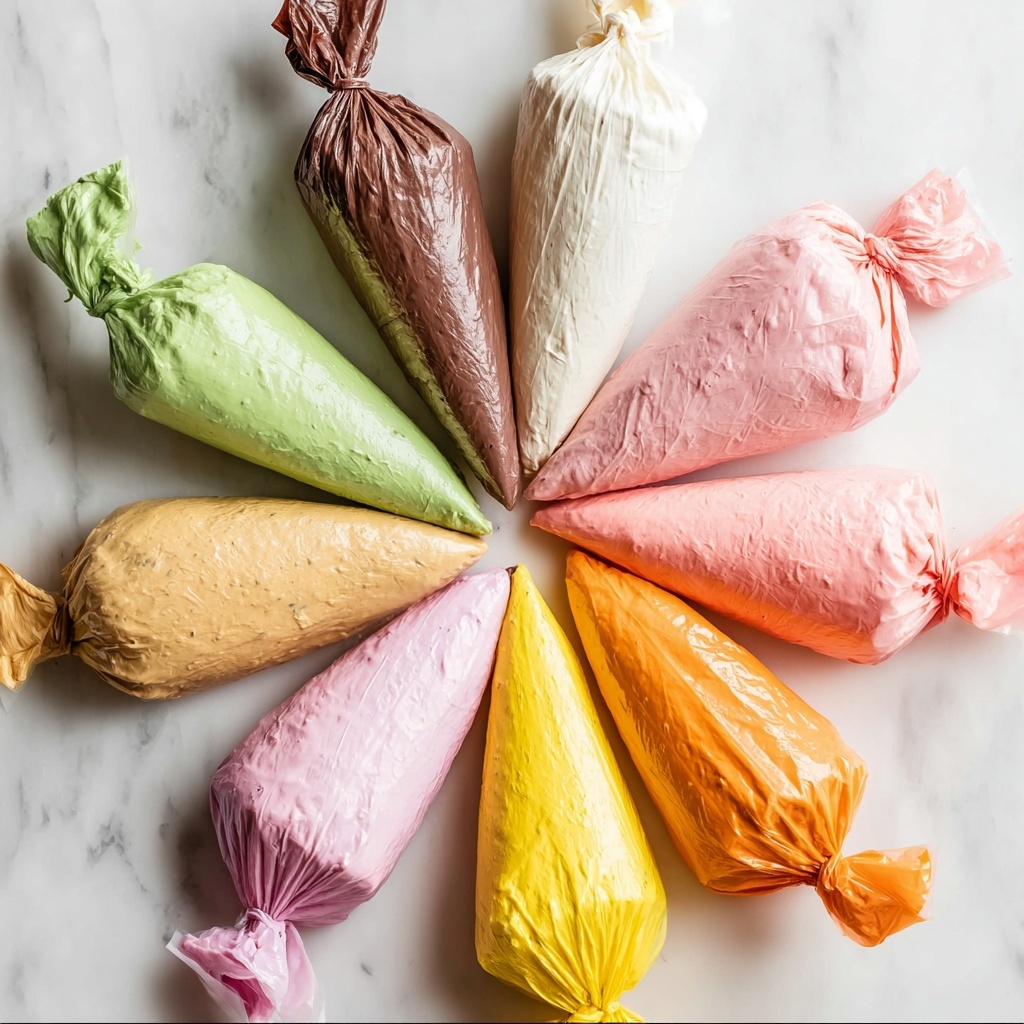
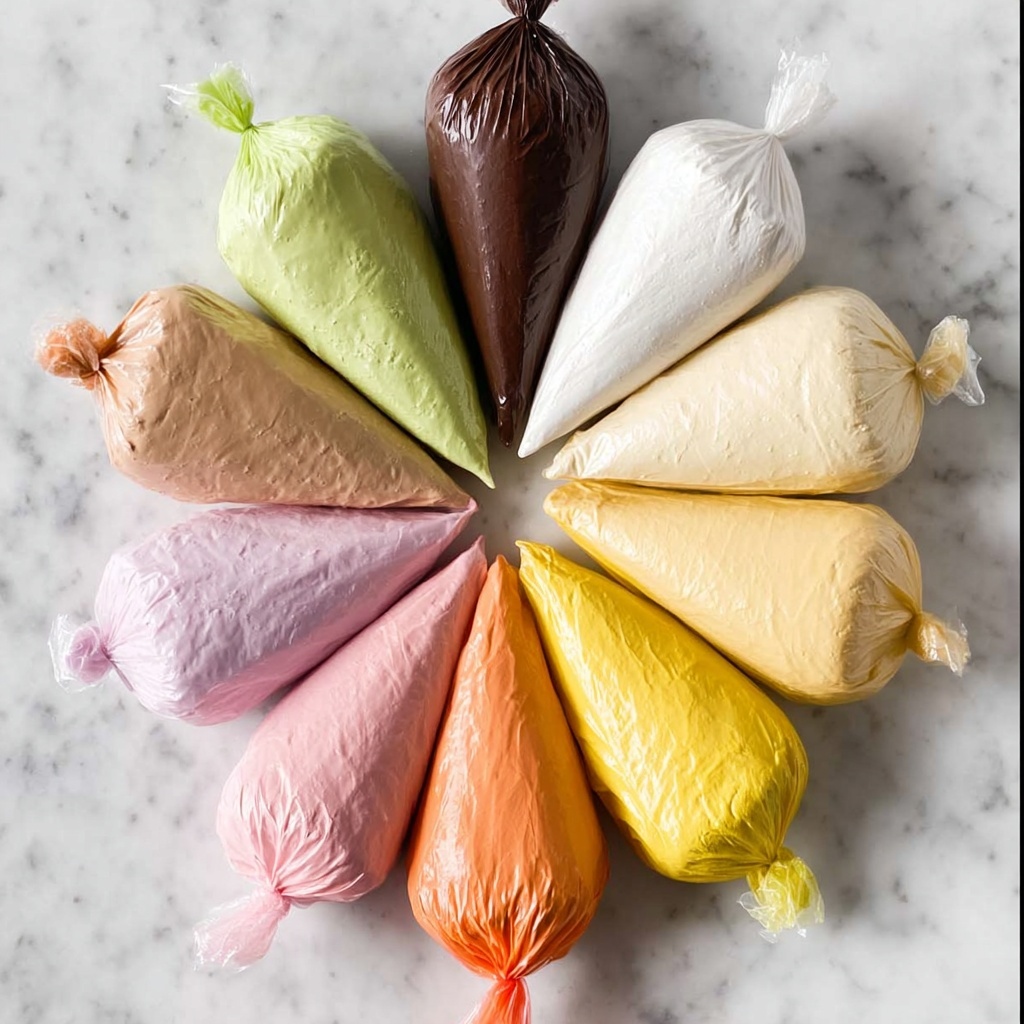
- Optional natural colors and flavors: These let you customize your icing with vibrant hues and delicious tastes without artificial additives.
How to Make Vegan Royal Icing Recipe
Step 1: Understand Consistency
Before you start, decide whether you want a thick icing for precise outlines or a runnier version to flood cookies. You can adjust the consistency by adding more powdered sugar to thicken or extra aquafaba or liquid colors to thin it out. Keep in mind that thinner icings will take longer to dry.
Step 2: Whip the Aquafaba
Pour the aquafaba into a mixing bowl or stand mixer fitted with a whisk attachment, and whisk for about two minutes until it becomes foamy. This is the foundation that gives your icing structure and volume.
Step 3: Gradually Add Powdered Sugar
Sift the powdered sugar into the whipped aquafaba in four increments. After each addition, whisk well until the mixture looks glossy and firm. This gradual incorporation helps avoid lumps and ensures a smooth, balanced texture.
Step 4: Mix in Lemon Juice
Whisk in the tablespoon of lemon juice to add a natural zing and to help the icing set nicely. It also gives your icing that classic royal icing tang which complements sweet baked goods perfectly.
Step 5: Customize with Colors and Flavors
Divide your icing into smaller bowls if you want multiple colors or flavors. Add natural powdered colors or extracts to each portion, keeping in mind that adding too much liquid may change your icing’s consistency, so compensate accordingly.
Step 6: Decorate Your Cookies
Prepare icing piping bags by snipping the tip to your desired opening size—smaller for fine lines, larger for flooding. Begin by piping outlines and let those set for about an hour before flooding the centers with a different color, if you wish. This layering technique creates crisp, vibrant designs with ease.
Step 7: Store Properly
When you’re done, keep any unused icing sealed in piping bags and refrigerated. It will stay liquid as long as it’s not exposed to air, lasting up to two weeks. Just make sure to cover it well to prevent drying out.
How to Serve Vegan Royal Icing Recipe
Garnishes
This Vegan Royal Icing Recipe shines when paired with delicate edible decorations like crushed nuts, sprinkles, or edible glitter. Adding these just after piping before the icing sets infuses extra texture and festive flair to your baking.
Side Dishes
While royal icing is usually the star on cookies or cakes, consider serving alongside fresh fruit slices or a warm cup of herbal tea to balance sweetness and create a cozy, inviting experience.
Creative Ways to Present
Turn your decorated treats into delightful gifts by packing cookies in clear boxes tied with colorful ribbons. Or, create themed designs using natural dyes from beetroot powder or spirulina for a standout presentation that’s also visually fun for parties and holidays.
Make Ahead and Storage
Storing Leftovers
Leftover iced treats should be stored in an airtight container at room temperature if unfrosted, or refrigerated if decorated with this Vegan Royal Icing Recipe, especially during warmer months to keep the icing firm and fresh.
Freezing
You can freeze the icing pre-piped into shapes on parchment paper; once frozen solid, transfer to sealed containers for up to three months. When ready, thaw in the fridge and use as you normally would, although texture might shift slightly.
Reheating
Royal icing is best used cold or at room temperature. If it thickens too much, gently stir in a tiny bit of aquafaba to loosen it rather than applying heat, which can affect consistency and appearance.
FAQs
Can I use canned chickpea liquid for aquafaba?
Yes, the liquid from canned chickpeas works perfectly for this Vegan Royal Icing Recipe. Just be sure to use it plain, without added salt or spices for the best results.
How long does this vegan royal icing take to dry?
Drying time varies based on thickness and humidity but expect at least a couple of hours to be dry to the touch. Thicker outlines will set faster than flooded areas.
Can I add flavor extracts to the icing?
Absolutely! Vanilla, almond, or citrus extracts are wonderful additions. Just add a few drops after mixing the lemon juice and before coloring to keep the consistency balanced.
Is this icing gluten-free and allergen-friendly?
Yes, this Vegan Royal Icing Recipe contains no gluten, dairy, or eggs, making it suitable for most allergies and dietary preferences.
What if my icing is too runny or too thick?
If it’s too runny, slowly add more powdered sugar until it reaches your desired thickness. If it’s too thick, whisk in small amounts of aquafaba or lemon juice to loosen it up.
Final Thoughts
This Vegan Royal Icing Recipe is truly a game changer for anyone looking to create beautiful, dairy- and egg-free decorations with ease. Its flexible consistency, simple ingredients, and delightful taste make it a must-try for bakers of all levels. Trust me, once you make it, you won’t want to go back to traditional royal icing!
Print
Vegan Royal Icing Recipe
- Prep Time: 5 minutes
- Cook Time: 0 minutes
- Total Time: 5 minutes
- Yield: Approximately 480 g (2 cups) of icing, enough to decorate about 20 medium-sized cookies
- Category: Desserts
- Method: No-Cook
- Cuisine: Vegan
- Diet: Vegan
Description
This Vegan Royal Icing recipe offers a perfect plant-based alternative to traditional royal icing, ideal for decorating cookies with a smooth, glossy finish. Made with aquafaba, powdered sugar, and lemon juice, this icing is easy to whip up and customize with natural colors and flavors. It achieves a thick consistency suitable for outlining cookies, but can also be thinned for flooding. It dries to a firm finish and stores well refrigerated in a sealed piping bag for up to two weeks.
Ingredients
Royal Icing
- 60 g aquafaba (chickpea cooking water)
- 400 g powdered sugar (confectioner’s/icing sugar), organic if in US
- 1 tablespoon lemon juice or orange juice
- Optional natural colors and flavors (powdered colors or liquid extracts)
Instructions
- Whisk Aquafaba: In a mixing bowl or stand mixer with a whisk attachment, whisk the aquafaba for about 2 minutes until foamy.
- Add Powdered Sugar and Lemon Juice: Sift the powdered sugar in four increments, whisking well between each until the mixture is glossy and smooth. Then whisk in the lemon juice thoroughly.
- Adjust Consistency: For outlining cookies, keep the icing thick enough to hold its shape without collapsing. To flood cookies, thin the icing by adding small amounts of aquafaba or liquid colors until reaching a pourable consistency.
- Add Colors and Flavors: Divide the icing into separate bowls as needed and stir in desired natural colors and flavorings. Adjust liquid as necessary if using powdered colors.
- Prepare for Decorating: Fill piping bags and snip the tip according to the desired line thickness. Pipe outlines onto cookies first. Allow outlines to dry for about an hour before flooding with icing of a different color if desired.
- Flood and Dry: Flood inside the outlined areas with runnier icing. Let the decorated cookies dry for several hours until the icing is fully set and dry to touch before serving.
- Storage: Store leftover icing in a sealed piping bag in the refrigerator for up to 2 weeks, keeping it moist and usable as long as it remains sealed and not exposed to air.
Notes
- Use aquafaba from canned chickpeas or homemade chickpea cooking water.
- Adjust thickness by adding more powdered sugar to thicken or aquafaba/liquid colors to thin.
- Runny icing takes longer to dry completely, so be patient when flooding cookies.
- When using powdered colorants, add slightly more liquid to achieve smooth consistency.
- Once exposed to air, icing will harden quickly, so store in sealed packaging.

