
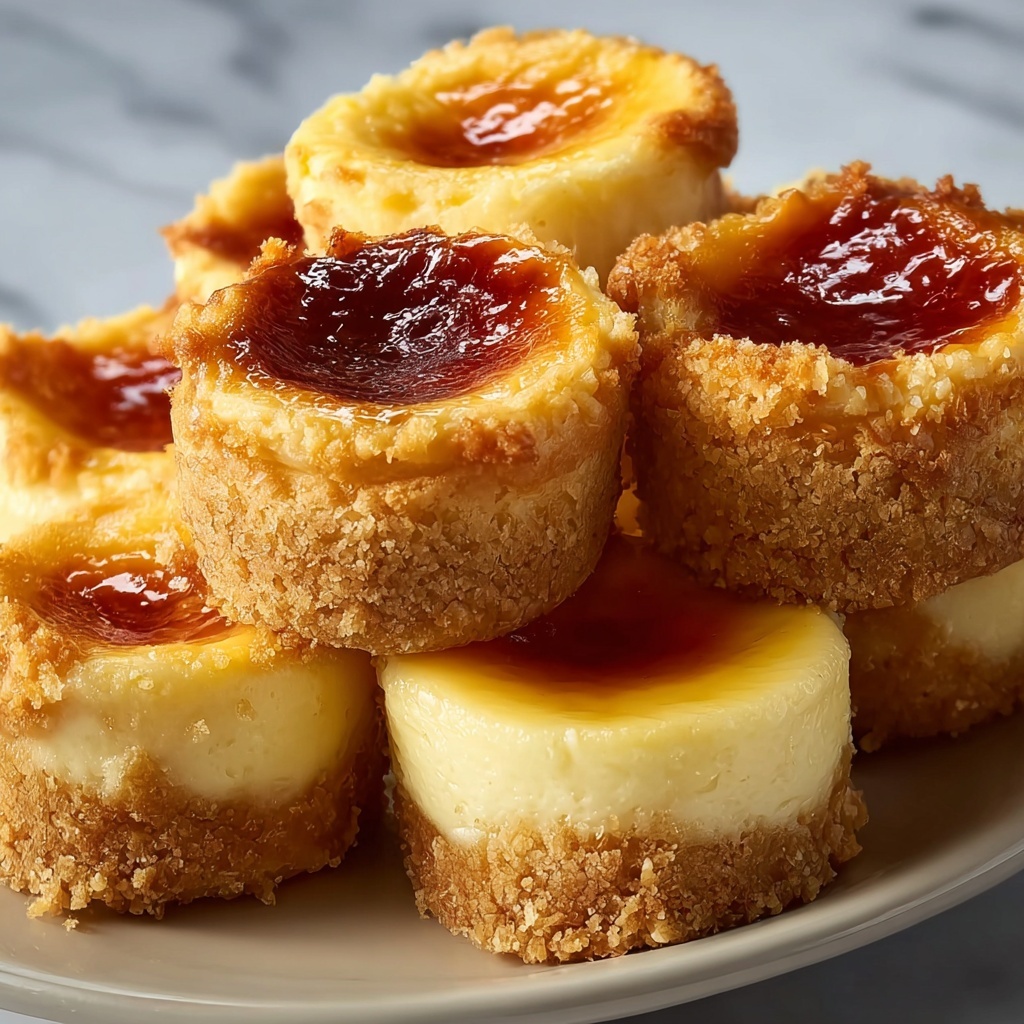
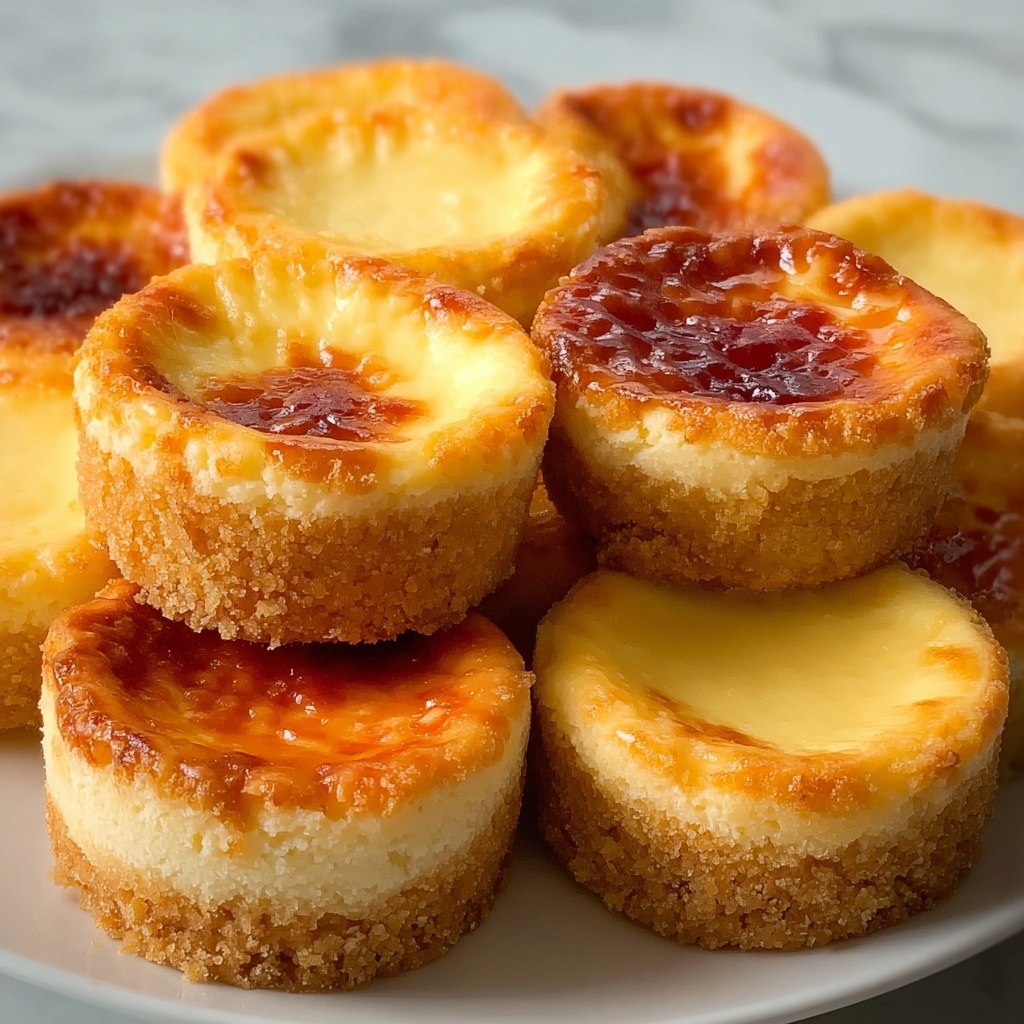
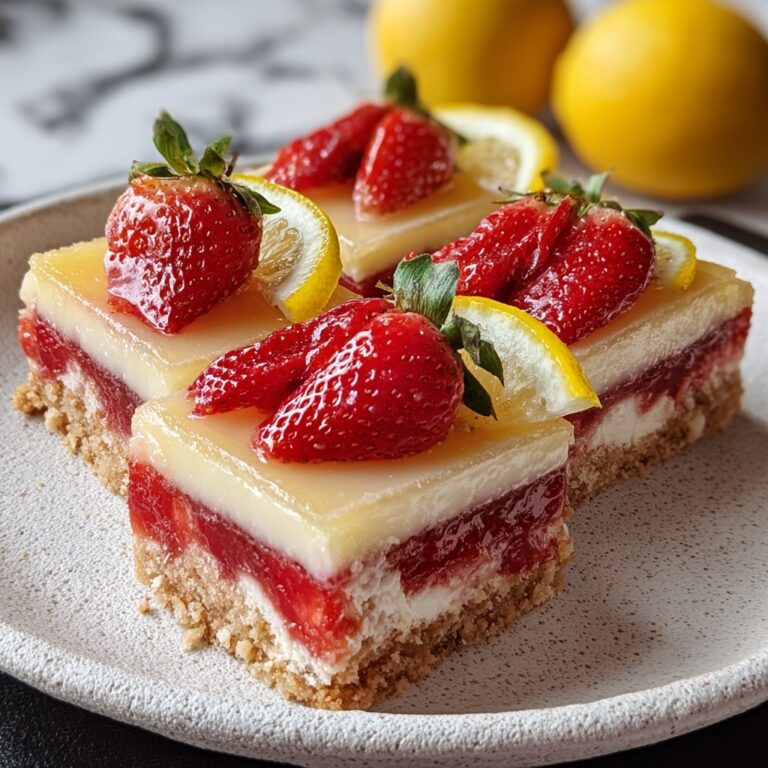
If you have a sweet tooth and love a dessert that feels both indulgent and light, then you’re going to fall head over heels for this Mini Cheesecake Tarts with Fresh Berries and Chocolate Shavings Recipe. These delightful little tarts combine a buttery, crumbly crust with a rich yet airy cheesecake filling, topped off with vibrant fresh berries and decadent chocolate shavings that add just the right touch of elegance and flavor. Perfect for impressing guests or just treating yourself, these mini delights bring together creaminess, freshness, and a hint of chocolate all in one bite-sized wonder.
Ingredients You’ll Need
The magic of this recipe is in its simple, quality ingredients. Each one plays a crucial role, from the graham cracker crust’s crisp texture to the cheesecake filling’s smooth richness, and the bright, fresh berries that add that perfect burst of flavor and color.
- Graham cracker crumbs: The base that gives your tart a perfect crunchy foundation.
- Granulated sugar: Adds just the right amount of sweetness to your crust and balances flavors.
- Unsalted butter, melted: Holds the crust together, adding richness and a golden hue.
- Cream cheese, softened: The star of the filling — creamy, smooth, and tangy delicious.
- Powdered sugar: Sweetens the filling without any grainy texture, keeping it silky.
- Vanilla extract: Brings warmth and depth to the cheesecake flavor.
- Heavy whipping cream: Whipped to add lightness and fluff to your filling.
- Fresh berries: Blueberries, strawberries, raspberries — fresh and juicy for topping.
- Chocolate shavings or drizzle: Adds a touch of luscious chocolate crunch and aroma.
- Caramel sauce: Optional drizzle for that extra caramelized sweetness.
- Fruit preserves: Apricot or strawberry preserves work beautifully to add a fruity glaze and shine.
How to Make Mini Cheesecake Tarts with Fresh Berries and Chocolate Shavings Recipe
Step 1: Prepare the crust
Start by preheating your oven to 350°F (175°C). Mixing the graham cracker crumbs with sugar and melted butter is easy and important to get the perfect texture—crumbly but packed enough to hold together. Press the mixture firmly into your tart pans or muffin tin with the back of a spoon; this ensures a crispy, sturdy base that won’t crumble apart once baked.
Step 2: Bake the crust
Bake those crusts for 5 to 7 minutes until they turn a beautiful golden brown. This step not only adds a toasty flavor but also ensures the crust stays crunchy when the creamy filling is added later. Let them cool completely before moving on—this is key to avoid a soggy bottom.
Step 3: Mix the cheesecake filling
While your crusts cool, whip up the cheesecake filling. Beat softened cream cheese until perfectly smooth, then add powdered sugar and vanilla. This blend should be creamy, luscious, and slightly sweet. Whipping heavy cream to stiff peaks separately before folding it in keeps the filling light and airy, making each bite melt in your mouth instead of feeling dense or heavy.
Step 4: Assemble and chill
Once the crusts have cooled, spoon the cheesecake filling into each shell, smoothing the tops for a polished look. It’s perfectly fine to fill a bit over the edge if you want that extra tall, indulgent effect. Refrigerate your mini tarts for at least two hours so the filling sets firmly and all those flavors meld beautifully together.
Step 5: Add the finishing touches
The best part is the toppings. Once chilled, crown your mini cheesecake tarts with fresh, colorful berries, sprinkle chocolate shavings generously, and feel free to add a drizzle of caramel or a touch of fruit preserves for an eye-catching glaze. Each topping adds its own personality and flavor dimension.
How to Serve Mini Cheesecake Tarts with Fresh Berries and Chocolate Shavings Recipe
Garnishes
A few fresh berries on top give these tarts vibrant color and juicy freshness that cuts through the richness. Chocolate shavings add an elegant look and just the right hint of chocolate flavor without overwhelming the delicate filling. You might also sprinkle edible flowers or mint leaves for an extra touch of charm and a burst of fresh aroma.
Side Dishes
These mini cheesecakes shine on their own but pair wonderfully with a simple tea or coffee — the perfect afternoon treat. You can also serve them alongside a light sorbet or vanilla bean ice cream for a refreshing complement, making dessert time feel extra special.
Creative Ways to Present
Think beyond the standard plate! Present these mini tarts on a rustic wooden board, surrounded by extra fresh berries and little dollops of whipped cream. Serve them in pretty mini tart boxes for parties, or even place one on a dessert buffet with small spoons and fresh flowers to impress your guests instantly.
Make Ahead and Storage
Storing Leftovers
You can store any leftover mini cheesecake tarts in an airtight container in the refrigerator for up to 3 days. The crust might soften a bit over time, but the flavor stays just as delightful. Keep them chilled to maintain that creamy texture and freshness of the toppings.
Freezing
If you want to make these ahead of time or save some for later, mini cheesecake tarts freeze beautifully. Place them on a baking sheet to freeze individually and then transfer to an airtight container or freezer bag. Thaw them in the refrigerator overnight before serving to keep their luscious texture intact.
Reheating
These tarts are best enjoyed chilled, so reheating is not recommended. If you want to bring them back to room temperature, just take them out of the fridge about 20 minutes before serving, so the flavors and creaminess come through perfectly.
FAQs
Can I use a different type of crust for the Mini Cheesecake Tarts with Fresh Berries and Chocolate Shavings Recipe?
Absolutely! While the graham cracker crust is classic, you can experiment with crushed digestive biscuits, Oreo crumbs, or even a nut-based crust for different textures and flavors. Just ensure it’s pressed firmly and baked to hold the filling well.
Is it possible to make these mini cheesecake tarts vegan or dairy-free?
Yes! You can swap out cream cheese and heavy cream for vegan cream cheese and coconut cream or aquafaba whipped to stiff peaks. Keep in mind flavors might differ slightly, but the result can still be delicious and creamy.
How long will the Mini Cheesecake Tarts with Fresh Berries and Chocolate Shavings Recipe keep in the fridge?
Stored properly in an airtight container, these tarts will stay fresh and tasty for up to 3 days in the refrigerator. Beyond that, the texture and freshness of the berries might start to diminish.
Can I prepare the filling a day in advance for this recipe?
Definitely! Preparing the cheesecake filling a day ahead saves time and actually helps deepen the flavors. Just keep it covered in the fridge and fold in the whipped cream right before assembling the tarts for the best airy texture.
What berries work best for topping these mini cheesecake tarts?
Fresh berries like strawberries, blueberries, raspberries, and blackberries all work wonderfully. Use a mix for a colorful, vibrant presentation, or stick to your favorite berry for a more uniform look and flavor. Just be sure they are fresh and firm.
Final Thoughts
Making these Mini Cheesecake Tarts with Fresh Berries and Chocolate Shavings Recipe is such a rewarding experience, both in taste and presentation. Every bite is a harmony of creamy cheesecake, crunchy crust, juicy berries, and luscious chocolate that will have everyone asking for seconds. I truly hope you give this recipe a go and enjoy the smiles and compliments that come right along with it!
Print
Mini Cheesecake Tarts with Fresh Berries and Chocolate Shavings Recipe
- Prep Time: 20 minutes
- Cook Time: 7 minutes
- Total Time: 2 hours 27 minutes
- Yield: 12 mini tarts
- Category: Dessert
- Method: Baking
- Cuisine: American
Description
These Mini Cheesecake Tarts are delicious, creamy, and perfect bite-sized treats with a buttery graham cracker crust, smooth cheesecake filling, and customizable toppings like fresh berries, chocolate shavings, and caramel drizzle. Ideal for parties or a sweet snack, they require no baking for the filling and chill to set for a luscious dessert.
Ingredients
For the Crust
- 1 ½ cups graham cracker crumbs
- ¼ cup granulated sugar
- 6 tablespoons unsalted butter, melted
For the Cheesecake Filling
- 8 oz cream cheese, softened
- ½ cup powdered sugar
- 1 teaspoon vanilla extract
- 1 cup heavy whipping cream
- 2 tablespoons powdered sugar (for whipped cream)
Toppings
- Fresh berries (blueberries, strawberries, raspberries, etc.)
- Chocolate shavings or drizzle
- Caramel sauce
- Fruit preserves (apricot, strawberry, etc.)
Instructions
- Make the crust: Preheat your oven to 350°F (175°C) to prepare for baking the crust.
- Combine crust ingredients: In a medium bowl, mix graham cracker crumbs, granulated sugar, and melted butter until well combined.
- Form crust bases: Spoon about 1 tablespoon of the crust mixture into each tart pan or muffin tin, pressing firmly to form an even base.
- Bake crust: Bake the crusts in the preheated oven for 5-7 minutes until golden brown. Remove and let cool completely.
- Prepare cheesecake filling: Beat softened cream cheese with an electric hand mixer on medium speed until smooth and creamy.
- Add sweeteners and flavor: Mix in powdered sugar and vanilla extract until fully incorporated and smooth.
- Whip cream: In a separate bowl, whip heavy cream with 2 tablespoons powdered sugar using an electric mixer until stiff peaks form, about 2-3 minutes.
- Fold cream into cheese mixture: Gently fold the whipped cream into the cream cheese blend until smooth and combined, taking care not to deflate the whipped cream.
- Fill the tarts: Spoon the cheesecake filling into cooled tart crusts, smoothing the top or filling slightly over the edge for a taller tart.
- Chill: Refrigerate the filled tarts for at least 2 hours or until the filling sets firmly.
- Add toppings: Once set, decorate tarts with fresh berries, chocolate shavings, caramel drizzle, or fruit preserves as desired.
- Serve and enjoy: Serve the chilled mini cheesecake tarts and delight in the creamy, sweet, and refreshing flavor combination.
Notes
- You can substitute the graham cracker crust with digestive biscuits or other cookies if preferred.
- To soften cream cheese faster, leave at room temperature for at least 30 minutes before mixing.
- Ensure whipped cream achieves stiff peaks to give the filling a light and airy texture.
- Toppings can be customized based on seasonal fruits or personal preference.
- Store leftover tarts in an airtight container in the refrigerator for up to 3 days.


